

Assembling a band saw can feel overwhelming, especially when you’re staring at a pile of components, a dense manual, and a heavy cast-iron base. But with the right sequence, tools, and clarity, you can transform those parts into a precision cutting machine in just a few hours. Whether you’re setting up a Laguna 18|CX, JET 714400K, or Axminster AP3600B, this guide walks you through every critical phase of band saw assembly. You’ll learn how to avoid common pitfalls, align components for accuracy, and set up guides and blades like a pro. By the end, your saw will be square, stable, and ready for resawing, curves, or metal work.
Unpack and Inspect Your Band Saw Components
Check for Shipping Damage Before Signing
Before signing for delivery, inspect the crate or box for dents, punctures, or crushed corners. If damage is visible, note it on the carrier’s receipt immediately. Report issues to the manufacturer within 48 hours to ensure warranty coverage remains valid. This simple step protects your investment and ensures you receive replacement parts if needed.
Once cleared, unpack in a clear, open space. Some models, such as the Axminster AP3600B, are taller than standard doorways, so outdoor unpacking may be necessary.
Remove All Packaging Safely
Cut away plastic wraps and remove styrofoam blocks carefully. The cast-iron table often arrives coated in protective oil and plastic film. Leave the film on top but slit the underside to access mounting holes without full removal. This protects the table surface during the entire assembly process while allowing you to work with mounting points.
Verify All Included Parts
Standard components include the cast-iron table and trunnions, fence rail with scales and flip stop, band wheel assembly and top cover, dust chute and hardware pack, stand for floor models, and wrenches with Allen keys. Take inventory against your model’s parts list to ensure nothing is missing before proceeding.
Note: The blade is typically not included with new saws. Purchase a compatible blade separately from an authorized dealer.
Handle Heavy Parts Properly
The main body and motor are extremely heavy. Use a 4×4 wooden block to tilt the saw backward when installing leveling feet. While solo assembly is possible, especially if you mount the motor first, work with a partner when lifting the base or stand to prevent injury and component damage.
Assemble the Stand and Level the Base

Attach the Stand Securely
Lay the stand flat and align the mounting holes with the saw body. Use the supplied screws and washers to connect the saw to the stand. Do not fully tighten all four bolts yet. Leave two loose for final adjustments after leveling to ensure proper alignment.
With assistance, carefully tip the unit upright. Keep feet flat on the floor to prevent tipping during this critical phase. The weight distribution changes significantly when the saw transitions from horizontal to vertical.
Level the Machine Completely
Even minor tilts can affect long-term stability and cut accuracy. Use a precision bubble level across the table surface and trunnions to verify level in all directions. Adjust the rubber leveling feet until the machine is perfectly level before fully tightening all stand bolts.
Pro Tip: High-end models like the Axminster AP3600B often arrive with excellent build quality, featuring minimal wobble, no plastic parts in critical areas, and smooth-moving components.
Mount and Align the Table
Install the Cast-Iron Table
Remove protective film from the underside of the table. Align the trunnions with the saw’s mounting slots and lower the table into place carefully. Insert bolts through the trunnions and add washers before securing with knurled-edge handles. Press the button on each handle, thread onto the bolt, and ratchet down until tight.
For JET models, insert screws but hand-tighten only. Final tightening comes after blade installation and squareness verification to allow for necessary adjustments.
Center the Blade in the Table Slot
With the throat plate removed, ensure the blade runs through the center of the table slot when installed. Misalignment causes binding and poor cuts. Adjust using set screws on JET 714400K or trunnion bolts on Laguna 18|CX. Recheck alignment after final tightening to ensure everything remains centered.
Verify 90-Degree Table Angle
Use a precision combination square to confirm the table is perpendicular to the blade. Place the square against the blade’s teeth, not the body, and check alignment at both top and bottom of the blade. Adjust as needed, then recheck after any movement to maintain accuracy.
Set the Tilt Mechanism
To access adjustment nuts on some models, tilt the table to 45 degrees. Though awkward, this is typically a one-time setup. Ensure the tilt locks securely at 0 degrees and moves smoothly. Reset to zero and verify squareness again before proceeding.
Install the Blade Correctly
Prepare for Installation
Before touching the blade, disconnect power to prevent accidental startup. Loosen the table lock to prevent deflection during setup. Remove the throat plate with a Phillips screwdriver. Raise the quick-tension lever to release upper wheel pressure, and open side guides by loosening adjustment knobs.
Choose the Right Blade for Your Task
Select the correct blade size for your model. The Laguna 18|CX uses a 14.5-inch blade while the JET 714400K uses a 14-inch blade. Choose based on your intended application. For resawing, use a 1-1/4-inch wide blade with 2-3 TPI. For curves, use a 1/4-inch wide blade with 6 TPI. For metal cutting, use a 1/2-inch bi-metal blade at low speed only.
Route the Blade Properly
Side-loading models like Laguna and Axminster require routing through a side access slot or throat plate opening. Insert the blade into the side slot, loop around the lower wheel, guide up through the throat opening, and over the upper wheel. Ensure it passes through both upper and lower blade guides.
Critical Check: Teeth must point downward on the right side (cutting side) and upward on the return side. If reversed, flip the blade inside out to correct orientation.
Center on Lower Wheel
Before tensioning, make sure the blade sits centered on the lower wheel tire. Miscentered blades track poorly and wear prematurely, wasting your investment in quality blades.
Tension and Track the Blade
Apply Proper Blade Tension
Apply tension before tracking the blade. Use the tension handle to push the upper wheel upward. Target approximately 1/4 inch deflection under firm thumb pressure. A change in thumbnail color when pressing the blade indicates sufficient tension on Laguna models. For professional results, use a magnetic tension gauge for consistent, accurate readings.
Warning: Under-tensioned blades wander during cuts. Over-tensioned blades risk fatigue and breakage, creating a safety hazard.
Adjust Blade Tracking
Peek through the tracking window to observe blade position while the saw is running. Turn the tracking knob clockwise to move the blade toward the rear of the wheel, or counter-clockwise to move it forward. Center the blade on the tire, then lock the knob in place. Let the saw run for 2-3 minutes, then recheck tracking and make minor adjustments as needed.
Set Up Guide Systems
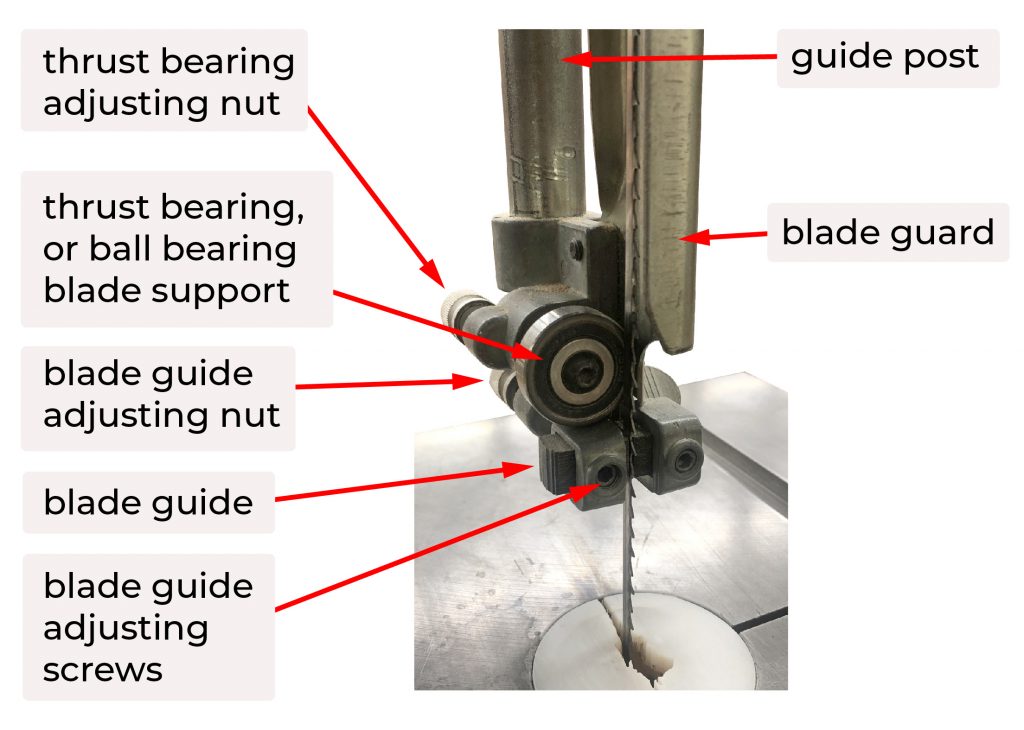
Adjust Upper Guide Assembly
Lock the guide post in position. Move the thrust shaft forward until the ceramic bearing lightly touches the back of the blade. Apply no pressure. Adjust side rollers or ceramic blocks to lightly contact both sides of the blade. If the blade weld is thick, insert a piece of paper between the weld and guide for clearance.
Pro Tip: Replace Allen-key-adjusted grub screws with thumb screws for tool-free tuning during operation.
Align Lower Guide Assembly
Slide the lower guide forward approximately 1/8 inch behind the blade gullet. Lock in place. Adjust side ceramics to light contact on both sides. Ensure all guide components are vertically aligned with the upper guides using a straightedge to verify alignment.
Verify Free Movement
Spin each roller by hand after adjustments. All bearings should rotate smoothly with no wobble or drag. Replace any stiff or noisy components before operation to prevent premature wear and inaccurate cuts.
Install Fence and Calibrate for Accuracy
Mount the Fence Rail
Use an 8 mm wrench for Laguna models or supplied screws for JET to attach the rail. Leave bolts slightly loose for fine-tuning alignment during setup. Slide the fence body onto the T-slot or rail ends once the rail is secured.
Align Fence Parallel to Blade
Use a ruler or straightedge to check alignment along the blade’s cutting path. Move the fence close to the blade but not touching to avoid deflection. Ensure the fence face is flat against the blade from top to bottom for consistent cutting results.
Zero the Fence Scale
Set the pointer to zero on the scale and lock the fence in place. Make a 10 mm test cut on scrap material. Adjust the scale to match the actual cut width, then re-lock. For JET models, loosen the four fence body screws, shift the fence until the cursor reads zero, and retighten.
Use the Flip Stop Effectively
Insert the flip stop into the rear T-slot and lock with the ratchet handle. Align the zero mark with the blade edge to set tenon depths, notch positions, or repetitive cuts. This accessory is invaluable for batch work and precision joinery.
Note: Some fences exhibit slight movement when locked. Tighten T-slot connections or consider aftermarket stiffeners for more rigid performance.
Connect Dust Collection
Use Side-Mounted Port If Available
Models like the Axminster AP3600B feature a side dust port that captures debris at the cutting zone, far more effective than lower ports. If your saw only has a lower port, consider retrofitting a side extraction kit for improved performance.
Connect to Your Dust Collector
Use 4-inch duct to link to a cyclone collector or shop vacuum for light use. Run dust collection during every cut to reduce airborne particles and improve visibility. Clean internal ducts monthly to maintain suction efficiency and reduce fire risk.
Final Calibration and Safety Checks
Recheck Table-to-Blade Squareness
Use a precision square to verify the table is still perpendicular to the blade. Adjust via set screws under the table if needed. Recheck after any transport or heavy use to maintain accuracy over time.
Confirm Fence Parallelism
Make a test cut on scrap wood and measure both ends of the offcut. If measurements differ, adjust the fence incrementally until parallel. This ensures consistent cut width across your workpieces.
Complete Pre-Use Safety Checklist
Before powering on, verify blade tension and tracking, guides adjusted with light contact, table square to blade, fence parallel and locked, dust collection connected, work lights functional if equipped, and emergency stop accessible. This final verification protects you during operation.
Frequently Asked Questions About Band Saw Assembly
How long does band saw assembly typically take?
Assembly typically takes 2-4 hours for experienced users and 4-6 hours for first-time assemblers. Budget extra time for alignment and calibration, which often takes as long as the physical assembly itself.
Do I need special tools for band saw assembly?
You need standard woodworking tools including wrenches, screwdrivers, a precision level, combination square, and Allen keys. Most models include necessary wrenches in the hardware pack. A magnetic blade tension gauge is recommended for precise tensioning.
Can I assemble a band saw alone?
Solo assembly is possible for most models by mounting the motor first, then the body. However, having a partner for lifting the base and stand significantly reduces injury risk and makes the process smoother.
Why does my blade keep tracking off-center?
Tracking issues usually stem from improper blade tension, worn wheel tires, or misaligned tracking knob. Start by verifying tension is correct, then check wheel condition and tracking adjustment with the saw running.
Should I buy a blade with my band saw?
Blades are typically sold separately, so plan to purchase at least one blade before operation. Choose based on your primary work: a 1-1/4-inch blade for resawing or a 1/4-inch blade for curves.
Key Takeaways for Successful Band Saw Assembly
Proper band saw assembly requires patience and attention to detail during every phase. Take time to level the base correctly, as this foundation affects all subsequent cuts. Invest extra effort in table, fence, and guide alignment, as these adjustments are one-time setups that determine long-term accuracy.
Blade selection directly impacts your saw’s performance. Match blade width and TPI to your intended applications, and always tension correctly to prevent wandering or breakage. Dust collection, particularly side-mounted ports, dramatically improves visibility and shop air quality during operation.
With your band saw assembly complete, you’re ready to tackle resawing, intricate scrollwork, or precision joinery. Keep the machine clean, recalibrate periodically, and replace dull blades immediately to maintain clean, accurate cuts across wood, plastic, foam, and metal for decades to come.