Is your band saw delivering crooked cuts, broken blades, or rough finishes? You are not alone. Band saw troubleshooting is essential for maintaining precision, safety, and productivity whether you cut wood, metal, or composites. From tooth stripping to erratic cordless operation, performance issues often stem from overlooked setup details, worn components, or incorrect blade selection.
This guide breaks down every common problem with actionable fixes based on verified mechanical principles and real-world operator data. You will learn how to diagnose blade wear, optimize tension and tracking, prevent chip welding, and restore smooth cutting fast.
Diagnose Blade Failure Fast

Identify Break Type: Fatigue vs. Impact
The way a blade breaks tells you exactly what went wrong. A straight break indicates fatigue failure caused by excessive tension, small wheels for wide blades, or blade rubbing guides and flanges. Reduce tension, check wheel compatibility, and re-track the blade to fix this issue.
A jagged or irregular break signals impact or movement problems. These breaks happen when material shifts in the vise or the saw head drops unexpectedly. Tighten your clamps, inspect the hydraulic system for leaks, and adjust the indexing sequence to prevent this type of failure.
Always inspect the break edge under magnification. A clean fracture line indicates long-term stress while a twisted or torn edge means sudden shock loading caused the failure.
Stop Tooth Stripping Now
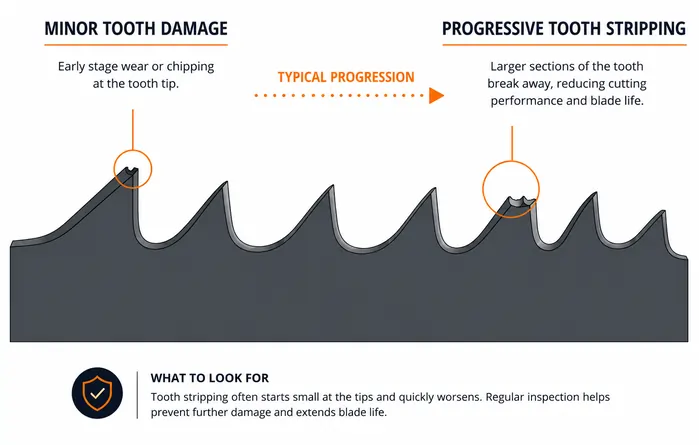
Why Teeth Strip During Cutting
Tooth stripping ranks among the most preventable band saw failures. Teeth shear off cleanly when specific conditions align in your setup.
The root causes include blade speed that is too slow, which makes teeth dig in and overload. Feed pressure that is too high exceeds tooth strength. Improper break-in causes chipping on new blades. Wrong pitch means too few teeth in contact, typically under three. Backward blade installation creates improper engagement.
Apply these immediate fixes. First, verify blade direction. Teeth must point downward and move forward. Second, check pitch. Use 10 to 14 TPI for thin materials under one-quarter inch and 3 to 6 TPI for thick stock. Third, follow the break-in procedure. Run at 50 to 75 percent feed pressure for the first ten minutes. Fourth, adjust feeds and speeds to match material type using the manufacturer chart.
Never restart a cut with a new blade in an old kerf. Residual debris damages teeth instantly and creates immediate failure.
Prevent Premature Dulling
Why Teeth Go Dull Too Fast
Dull teeth do more than slow you down. They increase heat buildup, accelerate motor wear, and risk work-hardening in metals like stainless steel.
Common causes include low feed pressure, which makes teeth rub instead of cut. Excessive blade speed overheats tooth tips. Inadequate coolant removes no lubrication or chip flushing. Work-hardening materials require full penetration per stroke.
Apply these solutions that work. Increase feed until chips are consistent and coiled, never powdery. Reduce RPM for hard alloys like titanium and chrome-moly. Verify coolant flow. Use 5 to 10 percent soluble oil mix and direct the nozzle to the cut zone. Use variable pitch or carbide-tipped blades for tough materials.
Blue discoloration on the blade signals overheating. Stop immediately and adjust your settings.
Fix Back Edge Wear
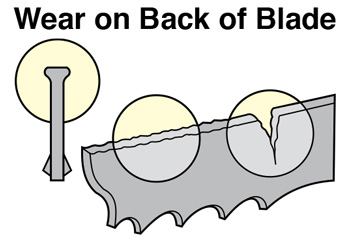
Why Blade Back Side Gets Worn
Wear along the back edge leads to fatigue cracks and early breakage. This problem stems from several identifiable causes.
Primary causes include guides that are too tight, which create friction and side-loading. Low blade tension allows flexing and micro-bending. Blade rubbing the wheel flange causes scoring from misalignment. Guide arms positioned too far apart provide inadequate lateral support.
Follow this step-by-step repair. First, loosen side guides and reset clearance using the paper shim method. Second, re-tension the blade to 28,000 to 32,000 psi using a tensionmeter if available. Third, re-track the upper wheel so the back edge clears the flange completely. Fourth, position guide arms just above the workpiece.
Ideal clearance measures 0.001 inch for bearing guides using a feeler gauge and approximately 0.005 inch for block types.
Eliminate Chip Welding
Why Chips Stick to Teeth
When chips fuse to gullets, they block cooling, increase heat, and reduce cutting efficiency dramatically. This condition has clear causes.
Chip welding happens when the chip brush is worn or missing. Poor coolant coverage allows chips to accumulate. Excessive feed or speed generates too much heat. Recirculated swarf from a dirty blade path carries debris back into the cut.
Apply these fixes. Replace the chip brush if bristles are worn and adjust it so it contacts the blade just after exit. Clean coolant nozzles and ensure even spray across the blade width. Reduce feed rate slightly and listen for smooth cutting sound. Blow out the blade path after each cut with compressed air.
Run the saw without material to test the brush. If it does not leave a light mark on the blade, the brush is not making contact.
Stop Rough or Washboard Cuts
Diagnose Surface Finish Issues
A washboard pattern means vibration, poor support, or incorrect setup. Identifying the cause requires systematic checking.
Likely causes include dull or damaged blades. Low tension makes the blade flex during the cut. Loose or distant guide arms provide inadequate support. Wrong tooth pitch overloads gullets. Incorrect feed and speed balance creates chatter.
Follow this action plan. Install a fresh blade first to rule out wear. Re-tension using the finger deflection test. Press three inches below the upper wheel. Deflection should not exceed one-quarter inch. Move guide arms within one-quarter inch of the workpiece. Match pitch so six to twelve teeth engage. Avoid more than twenty-four teeth in contact. Adjust feed until chip load looks right. C-shaped chips indicate optimal cutting.
For resawing, use a hook tooth blade with aggressive rake angle.
Correct Blade Drift and Crooked Cuts
Why Blade Wanders Off Course
Blade leading or drifting mid-cut ruins accuracy and wastes material. This problem has identifiable triggers.
Key triggers include overfeeding, which pushes the blade off line. Low tension reduces beam rigidity. Damaged tooth set creates uneven kerf width. Guide arms positioned too far apart provide poor control.
Apply these corrections. Reduce feed pressure incrementally. Increase tension to the recommended level. Inspect tooth set under magnification and replace if asymmetrical. Tighten and reposition guide arms as close to the work as possible.
Never angle the fence to compensate for drift. Fix the root cause instead of hiding the symptom.
Prevent Blade Breakage
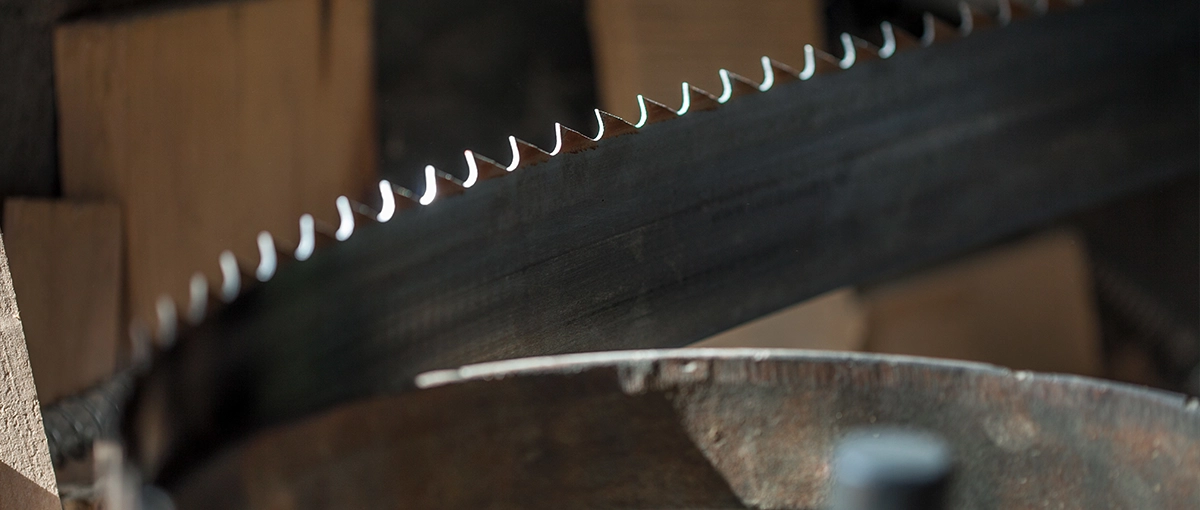
Avoid Costly Breaks Before They Happen
Frequent blade breaks signal deeper mechanical issues that need attention. Preventing breaks requires understanding the two main failure types.
Prevent fatigue breaks by matching blade width to wheel size. A one-half inch blade needs at least a fourteen inch wheel. Use a tensionmeter and do not rely on built-in gauges alone. Replace chipped or cracked guides because they create stress points.
Stop impact breaks by securing the workpiece with nesting clamps or secondary supports. Ensure the saw head fully retracts before indexing. Check hydraulic cylinders for leaks on powered models.
For Milwaukee M18 models, lateral deflection should measure approximately one-eighth inch under thumb pressure. More deflection indicates low tension.
Optimize Blade Tracking
Align Upper Wheel Correctly
Only the upper wheel affects tracking and cut quality. Proper adjustment makes the difference between straight cuts and wandering blades.
Two alignment methods work. Center the blade body on the crown of the wheel. Alternatively, center the teeth at the apex of the crown.
For one-inch blades, about one-eighth inch of blade should extend over the top. The back edge should align flush with the wheel.
Critical rules apply. The blade must not hang off the back of the wheel, especially for blades three-quarters inch and wider. Re-check tracking after tensioning because tension changes blade position. Lower wheel tracking matters less as long as the blade stays on the tire.
Turn the tracking knob slowly while spinning the wheel by hand for precise adjustment.
Set Guide Clearances Precisely
Adjust Side and Thrust Guides Right
Improper guide setup causes wear, loss of set, and vibration. Setting clearances correctly extends blade life significantly.
Position side guides just behind the gullets, never touching teeth. Use a dollar bill shim for approximate gap, approximately 0.002 to 0.005 inch.
Bearing guides should not spin freely when the upper wheel turns. They should engage under light fingertip pressure on a tooth. Ideal clearance measures 0.001 inch using a feeler gauge.
The thrust bearing sits behind the blade near the gullet. Set it close but not touching. It should spin only when pressure is applied.
Too tight removes tooth set. Too loose allows blade oscillation. Both conditions cause problems.
Align Fence and Table Accurately
Do Not Align Fence to Blade
This common mistake causes future inaccuracies. The correct method differs from what many operators assume.
Follow this correct method. First, align the fence parallel to the miter slot using a combination square. Second, adjust the table angle so both the miter slot and fence align with the blade path.
Test with a kerf check. Make a shallow rip in scrap wood. Observe where the blade back rubs the kerf. If it rubs the right, rotate the table counterclockwise. If it rubs the left, rotate the table clockwise. Repeat until the blade runs centered.
Use a dial indicator for precision alignment on final verification.
Choose the Right Blade
Match Pitch to Material Thickness
Using the wrong tooth count ruins performance. Matching pitch to material thickness is fundamental.
For materials under one-quarter inch, use 10 to 14 TPI. For one-quarter to one inch thickness, use 6 to 10 TPI. For materials over one inch, use 3 to 6 TPI.
Tooth geometry matters. Raker teeth serve general purpose cutting. Skip teeth work for soft materials like wood and aluminum. Hook teeth provide fast resawing with high chip clearance. Variable pitch reduces vibration in mixed materials. Carbide-tipped blades handle hard metals and abrasive stock.
Maintain three to six teeth in contact at all times. This guideline prevents both tooth overload and gullet overload.
Break In New Blades Properly
Extend Blade Life by 50 Percent
Skipping break-in causes chipped teeth and early failure. This step takes minutes but saves significant cost.
Follow this procedure. Start at 50 to 75 percent of normal feed pressure. For Ellis saws, use one-third pressure for the first ten minutes. Gradually increase feed over six to twelve inches of cutting. Never re-enter an old kerf with a new blade.
The result is smoother cutting, longer life, and fewer tooth failures.
Maintain Clean Blade Path
Prevent Heat and Wear Buildup
Residue causes friction, overheating, and poor tracking. Clean the blade path regularly.
After every use, remove sawdust, pitch, resin, or metal shavings. Use a small brush, compressed air, or solvent. Apply pitch remover for wood and degreaser for metal.
Perform weekly deep cleaning. Disassemble guides and clean mounting surfaces for best performance.
Troubleshoot Cordless Models
Fix Milwaukee M18 Power Issues
Battery problems cause 60 percent of cordless failures. Understanding these issues saves diagnosis time.
For dead or weak batteries, press the fuel gauge button. One flashing light means critically low charge. Charge time takes 30 to 60 minutes. Replace batteries older than two to three years.
For poor connection, clean the gold terminals on the battery and tool with isopropyl alcohol. Reinsert firmly until it clicks.
For overheating protection, the thermal cutoff shuts down during heavy use. Let the tool cool naturally. Do not refrigerate it. Use multiple batteries in rotation.
Never use third-party batteries. They void the warranty and risk damage.
Diagnose Trigger and Motor Failures
Why Cordless Saws Start Then Stop
Intermittent operation points to internal faults. Systematic diagnosis identifies the problem.
Common problems include stuck or dirty triggers. Blow out with compressed air. Worn trigger assemblies cause full-speed-only operation or no response. Faulty circuit boards lead to erratic behavior or shutdown. Loose wiring requires checking connections at the switch, motor, and battery terminal.
Follow these DIY check steps. Disconnect the battery. Remove the housing with a T20 Torx bit. Inspect for loose wires or corrosion. Reconnect and secure all connections.
A burning smell or smoke means stop immediately. The motor may be burned out. Contact professional service.
Verify Performance with Tools
Use the Right Diagnostic Gear
Do not guess. Measure instead.
Essential tools include a tensionmeter to confirm 28,000 to 32,000 psi. A tachometer verifies actual blade speed. Feeler gauges set precise guide clearance. A combination square aligns table and fence. A fisherman scale measures head pressure on Ellis models, which should not exceed eight pounds.
Keep a log of settings for repeat jobs. This practice saves time and ensures consistency.
Follow Preventive Maintenance
Stay Ahead of Failures
Regular checks prevent downtime and costly repairs. A maintenance schedule keeps your saw running optimally.
Clean the blade path after each use. Inspect guides weekly or every ten hours. Check tension before each use. Verify tracking after blade change. Lubricate wheels monthly if applicable. Test batteries monthly.
Keep spares on hand including blades, bearings, and a cleaning kit for fast turnaround.
Frequently Asked Questions About Band Saw Troubleshooting
Why does my band saw keep breaking blades?
Blade breakage usually stems from excessive tension, incompatible wheel diameter, or worn guides. Check your tension with a tensionmeter and ensure your blade width matches your wheel size. Inspect guides for chips or cracks that create stress points.
How do I stop crooked cuts on my band saw?
Crooked cuts result from dull blades, low tension, loose guides, or misaligned tables. Replace worn blades first. Re-tension using the finger deflection test. Position guide arms within one-quarter inch of the workpiece. Align your fence parallel to the miter slot rather than to the blade.
What causes tooth stripping on metal cuts?
Tooth stripping happens when speed is too slow, feed pressure is too high, or the blade pitch is wrong for material thickness. Verify blade direction is correct. Use finer pitch for thin materials. Follow the break-in procedure for new blades.
How often should I replace the chip brush?
Replace the chip brush when bristles are worn shorter than one-quarter inch or missing entirely. The brush should contact the blade just after it exits the cut. Test by running the saw without material and checking for a light bristle mark on the blade.
What blade tension should I use?
Most band saws require 28,000 to 32,000 psi. Use a tensionmeter for accuracy. Without a meter, perform the finger deflection test. Press the blade three inches below the upper wheel. Deflection should not exceed one-quarter inch.
Why is my cordless saw starting then stopping immediately?
This symptom typically indicates battery issues, overheating protection, or trigger problems. Test with a known-good battery. Allow the tool to cool if it overheated. Check the trigger for debris or wear.
Key Takeaways for Effective Band Saw Troubleshooting
Successful band saw troubleshooting starts with proper setup and ends with consistent maintenance. Most cutting problems stem from simple oversights. Incorrect tension, dull blades, misaligned guides, and poor coolant flow account for the majority of performance issues. By following these diagnostic steps and preventive practices, you will maximize blade life, improve cut quality, and keep your saw running reliably whether in the shop or on the jobsite.
Always refer to your machine manual for model-specific specifications. Never compromise on safety. Keep guards in place and power off during adjustments. Keep spare blades and essential tools on hand for quick maintenance turnaround.