If your band saw isn’t cutting straight, vibrating excessively, or struggling through material, the issue likely lies in one of its core components. Understanding band saw components is critical for achieving precision, extending blade life, and ensuring safe operation. Whether you’re resawing hardwood, cutting steel tubing, or crafting intricate curves, each part from the frame to the blade guides plays a vital role in performance.
This guide breaks down every major band saw component, explains its function, and shows how to maintain and optimize it. You’ll learn how to diagnose problems, choose the right blade, adjust guides properly, and upgrade your machine with aftermarket parts.
Rigid Frame Construction for Stable Operation
The frame is the backbone of any band saw. Constructed from welded steel or cast iron, it supports all moving parts and absorbs cutting forces. A rigid frame prevents flex during aggressive cuts, especially when resawing thick stock or cutting metal.
Welded Steel and Cast Iron Frame Options
Floor-standing models often integrate the frame directly with the base for maximum stability. Inspect the frame regularly for cracks, warping, or loose fasteners. Even minor deformation can throw off alignment and degrade cut quality.
Stable Base for Vibration Reduction
The base adds mass to reduce vibration and keep the machine level. Most bases are made from cast-iron plate, though some use reinforced steel. A solid base ensures consistent performance by minimizing movement during operation.
Check that the base is level and that rubber feet are intact. If your saw rocks or vibrates excessively, the base may need adjustment or replacement.
Precision Table and Fence Setup
The work table supports material during cutting and must remain flat and true. Typically made of cast iron, it provides excellent vibration damping and durability.
Essential Table Features
Key features include a blade slot for blade installation, a miter slot for jigs and gauges, and T-slots or dovetetail grooves for fence mounting. Many tables tilt up to 45 degrees for bevel cuts.
On split-table models, a removable alignment pin ensures accurate reassembly after blade changes. Always replace this pin after changing the blade unless actively adjusting the guides.
Squaring the Table to the Blade
Misalignment between the table and blade causes drift and inaccurate cuts. Tram the table to be perfectly perpendicular to the blade every time you change the blade. Use a combination square or dial indicator for accuracy.
Even a slight misalignment, as little as 0.5 degrees, can result in tapered cuts. After truing, lock the table securely to prevent movement during use.
Using a Rigid Rip Fence
The guide fence ensures straight, repeatable cuts by aligning the workpiece parallel to the blade. High-quality fences offer micrometer adjustments for precise positioning. Lock them firmly in place before cutting.
Avoid using the fence when cutting curves or freehand shapes, as this increases the risk of kickback.
Blade Selection and Proper Tensioning
The blade is the cutting element, a continuous loop of toothed metal. Choosing the right blade is essential for performance.
Matching Blade Material to Your Work
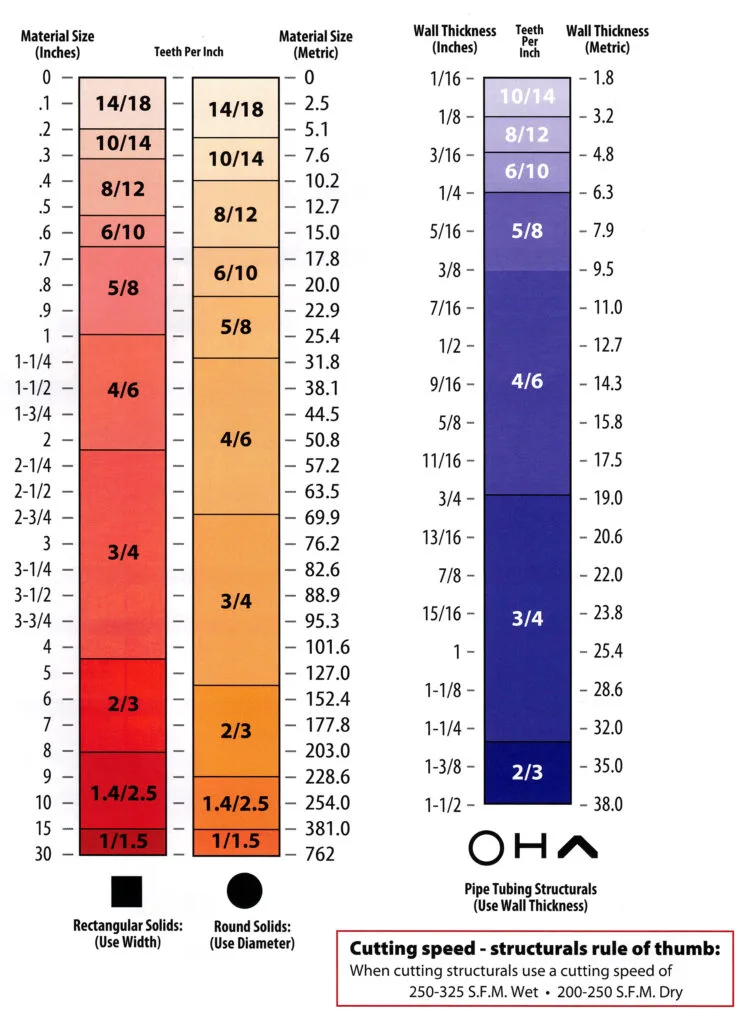
Blade materials include high-carbon steel for wood, bi-metal with HSS teeth on alloy backing for metal, and carbide-tipped for hard metals and abrasive materials.
Select teeth per inch based on material thickness. Use higher TPI for thin materials and lower TPI for thick stock.
Choosing the Right Blade Width
Blade width affects stability and maneuverability. Narrow blades, 1/8 inch to 1/4 inch, enable tight curves. Medium blades, around 1/2 inch, balance curves and straight cuts. Wide blades, 3/4 inch to 2 inches, provide maximum rigidity for resawing.
Applying Correct Blade Tension
Proper blade tension prevents drift, tracking issues, and premature failure. Most saws have a tension scale, but these are often inaccurate and overstate actual tension.
For wood blades around 1/2 inch, aim for 15,000 to 20,000 psi per manufacturer specs. Use a deflection test: press the blade sideways, and it should return smoothly with minimal flex. Invest in an external tension gauge for accuracy.
Over-tensioning risks blade breakage and wheel damage. Under-tensioning leads to poor tracking and wandering cuts.
Maintaining the Tension System
Inspect the tension spring for fatigue or permanent stretch. Replace if deformed. Check the tension block for wear or uneven contact. Lubricate screw threads periodically to ensure smooth adjustment.
Drive Wheels and Motor Configuration
Two main wheels, upper and lower, support and drive the blade. The lower wheel is powered, and the upper wheel is adjustable for tension.
Crowned Wheels with Rubber Tires
Both wheels feature a slight crown to help center the blade. They’re covered with hard rubber or urethane tires that cushion the blade, reduce noise, and prevent metal-to-metal contact.
Wheel cores are typically cast iron for wood saws or aluminum for metal saws. Shut off the machine immediately if the blade breaks, as exposed ends can gouge the tires.
Motor Power Requirements
The motor powers the lower wheel via V-belts. Power varies by application. Benchtop wood saws use 1/3 to 3/4 HP. Floor-standing wood saws use 1 to 3 HP. Industrial metal saws use up to 5 HP.
Some models include a soft-start feature that ramps up speed gradually to protect the motor and belts. Let the motor reach full speed before feeding material.
Variable Speed for Different Materials
Fixed-speed motors are common in woodworking. For metal cutting, variable-speed motors are essential. Optimal speeds are 50 to 90 SFPM for metal and 3,000 plus RPM for wood.
Adjust speed based on material type and thickness. Slower speeds prevent overheating and extend blade life.
Replacing Worn Drive Belts
Drive belts transmit power from motor to wheel. Use OEM-spec V-belts. Inspect regularly for cracks, glazing, or slippage. Replace as needed.
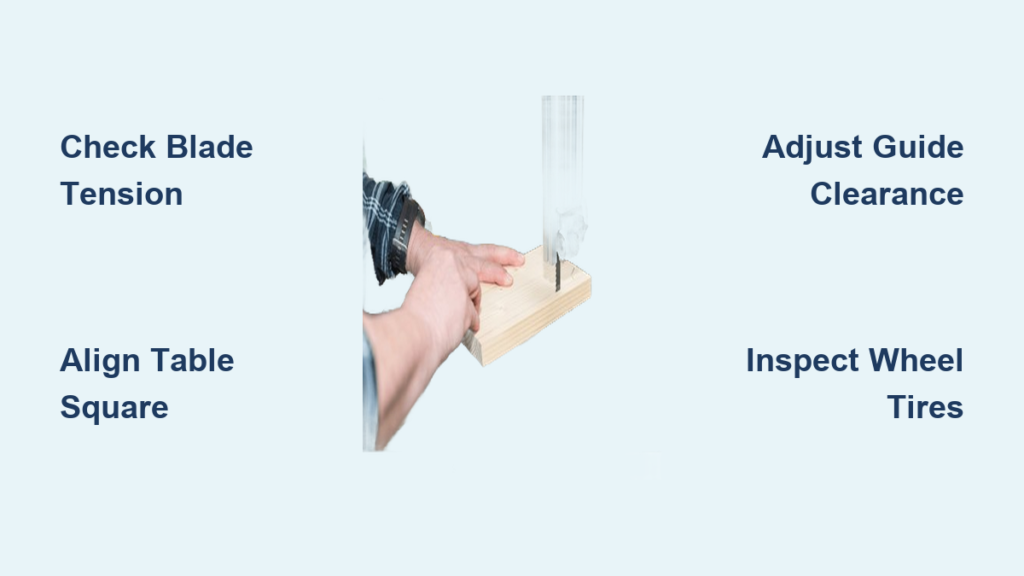
Blade Guide System Configuration
:max_bytes(150000):strip_icc()/paper-spacer-42c29ec4288f4f8095f89cf4edd9f599.jpg)
The guide post holds the upper guide assembly and adjusts vertically. Position guides 1/4 inch above the material for optimal support.
Installing Proper Blade Guards
Blade guards cover exposed sections for safety. The upper guard is often transparent polycarbonate for visibility. Wheel guards are hinged for blade changes.
Never operate the saw without guards in place.
Setting Side Guides with Paper-Thin Clearance
Side guides prevent lateral blade movement. Three types exist.
Ball bearing guides are most common. Bearings contact the blade body, not teeth. Set with 0.004 inch clearance, approximately one sheet of paper.
Guide blocks made of phenolic or brass are found on older or budget saws. They press lightly against blade sides and wear faster.
Ceramic guides are an aftermarket upgrade that can touch the blade lightly for maximum control. They run cooler and extend blade life.
Adjust all side guides so the blade moves freely but has no side-to-side play.
Aligning the Thrust Bearing
The thrust bearing prevents the blade from pushing backward off the wheels. It should not spin when idling and should engage only during cutting.
Proper clearance reduces heat and bearing wear.
Using a Leather Blade Wiper
A leather blade wiper removes pitch, resin, or coolant buildup as the blade passes over the wheels. Replace it when hardened or cracked.
Directing Coolant with Drip Guide
In metal-cutting saws, the upper drip guide channels coolant onto the blade. This reduces heat, improves chip removal, and extends blade life.
Dust Collection and Coolant Systems
A dust port on the cabinet or table connects to a shop vacuum or dust collector. Effective dust extraction improves visibility, reduces fire risk from fine sawdust, and keeps bearings and guides clean.
Upgrade with aftermarket shrouds or ducting kits for better performance. Seal gaps around the table and cabinet.
Coolant System for Metal Cutting
Metal-cutting band saws rely on coolant systems with a reservoir for water-soluble oil, a pump and tubing to deliver fluid to the blade, and nozzles to spray coolant at the cutting zone.
Maintain the system by replacing fluid regularly, cleaning filters, and aligning nozzles for full coverage.
Safety and Control Features
Adjustment controls let you fine-tune blade speed on variable models, table tilt from 0 to 45 degrees, guide height, and feed rate on automatic models.
Safe Feed Methods
Manual feed is standard in woodworking. Use push sticks for safety. Automatic feed is used in industrial settings and improves consistency and safety.
Automatic systems must have emergency stop and overload protection.
Emergency Stop Functionality
The emergency stop button is prominently located and cuts power instantly. Use it during jams, blade breaks, or any hazardous situation.
Tension Indicator Limitations
Many saws have a tension indicator, but it’s often inaccurate. Use it only as a starting point. Verify with deflection testing or an external gauge.
Aftermarket Upgrades and Replacement Parts
:max_bytes(150000):strip_icc()/MPD105084-2000-bbec4e480298404896d4b3901e2b81ab.jpg)
Aftermarket parts can transform a basic saw into a precision tool. Available upgrades include ceramic guides for cooler, longer blade life, and cast iron tables for improved flatness.
Digital tension gauges provide accurate tensioning. LED work lights improve visibility. Riser blocks increase cutting depth from 6 to 12 inches.
BandSawParts.com offers over 9,000 SKUs for Marvel, Doall, Hyd-Mech, and HEM models, including custom gears and precision-machined parts.
Installing Riser Blocks for Deeper Cuts
A riser block extends the distance between wheels, increasing vertical capacity. Install it between upper and lower frame sections. It must match your model for proper alignment.
Maintaining Peak Band Saw Performance
Misaligned guides are the top cause of poor cuts and blade failure. Always check tracking, adjust tension using feel or gauge, square the table, and set guides with paper-thin clearance on all sides.
Recommended Maintenance Schedule
Perform daily cleaning of the table, check tension, and inspect guards. Weekly, lubricate guide posts, clean dust ports, and inspect belts. Monthly, check wheel alignment, replace wipers, and inspect tires. Annually, perform a full teardown, replace bearings, and service the motor.
Troubleshooting Common Problems
Vibration is caused by unbalanced wheels, worn bearings, or loose parts. Blade drift indicates misaligned guides, incorrect tension, dull blade, or poor tracking. Poor finish results from wrong blade type, dull teeth, or incorrect feed rate.
Optimizing Your Band Saw for Specific Applications
Woodworking Setup
Use wide blades, 1/2 inch to 2 inches, for resawing. Choose hook or raker tooth patterns. Install ceramic guides and high-performance tires. Connect dust collection.
Focus on frame rigidity and table flatness.
Metal Fabrication Setup
Use bi-metal or carbide blades. Install coolant systems and drip guides. Use ball bearing or roller guides with variable speed control. Consider automatic feed if available.
Ensure precise tracking and stable power delivery.
Enhancing Benchtop Models
Hobbyists can upgrade 10 to 14 inch saws with digital tension gauges, LED lights, aftermarket guides, riser blocks, and cast iron tables. These upgrades dramatically improve performance on budget machines.
Frequently Asked Questions About Band Saw Components
What is the most important band saw component for cut accuracy?
The blade guides and table alignment are most critical for cut accuracy. Proper guide adjustment with paper-thin clearance and a trammed table perpendicular to the blade directly determine cut precision.
How often should I check blade tension?
Check blade tension every time you change the blade. Tension can change during operation, so verify with a deflection test rather than relying solely on the tension scale.
What band saw components wear out fastest?
Blade guides, drive belts, rubber tires, and the leather wiper wear fastest. Regular inspection and replacement prevent poor cut quality and machine damage.
Can I upgrade my benchtop band saw with aftermarket parts?
Yes, upgrades like ceramic guides, digital tension gauges, LED lights, and riser blocks significantly improve benchtop model performance. Many aftermarket parts are model-specific.
What causes excessive vibration in a band saw?
Excessive vibration typically comes from unbalanced wheels, worn bearings, loose components, or improper tire condition. Check wheel balance, bearing integrity, and fastener tightness.
How do I know if my blade guides need adjustment?
If the blade wanders during cuts, produces angled or tapered results, or shows premature wear, your guides likely need adjustment. Always set guides with paper-thin clearance.
Final Thoughts on Band Saw Component Mastery
A band saw is only as good as its setup. By understanding each band saw component, from frame to blade guides, you can achieve cleaner cuts, longer blade life, and safer operation. Regular maintenance, proper adjustment, and smart upgrades turn even basic models into high-performance tools.
The key is to check tracking, tension, and table squareness every time you change the blade. Adjust guides with paper-thin clearance and keep rubber tires clean. Whether you’re a woodworker, metal fabricator, or hobbyist, mastering these components gives you full control over your machine’s capabilities.