
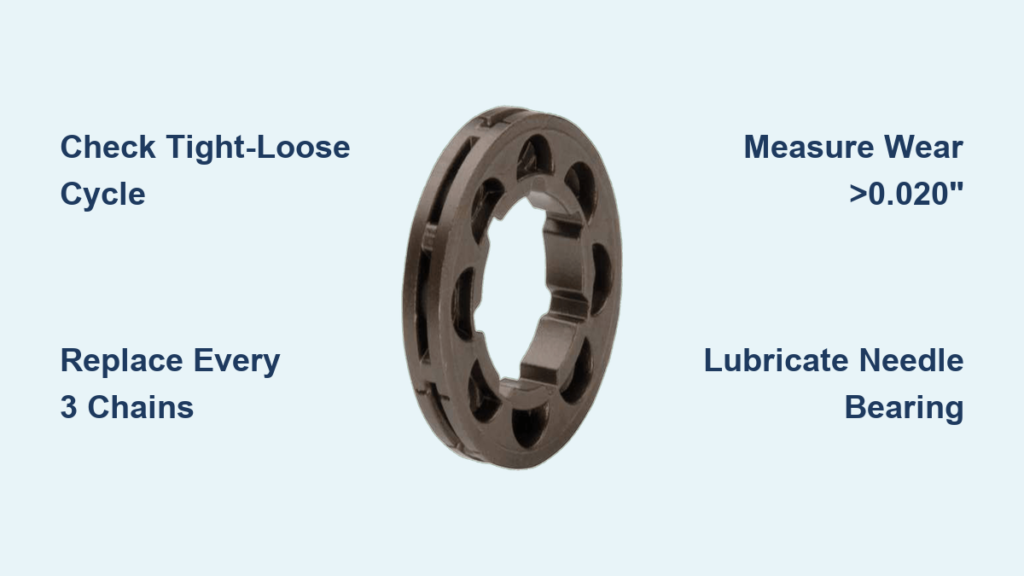
If your chainsaw chain binds, jumps, or loses tension unexpectedly, you are likely facing chainsaw sprocket problems. A worn drive sprocket disrupts the entire cutting system, causing inefficient performance and potential damage to your engine’s crankshaft and bearings. Many users mistakenly blame the chain for these issues, but inconsistent tension and jumpy rotation often stem from the sprocket teeth failing to engage drive links properly.
This guide explains how to identify wear patterns, distinguish between spur and rim sprockets, and execute a step-by-step replacement. You will learn the critical “tight-loose” diagnostic test and the industry standard for replacement intervals. Whether you cut firewood occasionally or mill lumber professionally, maintaining this component ensures peak safety and performance for your equipment.
Spot Sprocket Wear Early

Check for Chain Binding and Jamming
A worn sprocket causes the chain to bind or jam even when you apply full throttle. As the teeth wear down, they lose alignment with the chain drive links, resulting in poor engagement. Instead of rotating smoothly, the chain may catch, stutter, or stop entirely under load. This issue is most noticeable during angled cuts or when the saw faces heavy resistance. If the chain spins freely at idle but locks up during use, inspect the sprocket before assuming clutch failure.
Test the Tight-Loose Cycle
One of the most reliable indicators of chainsaw sprocket problems is the “tight-loose” cycle. Rotate the chain manually by hand and feel for rhythmic changes in tension. A healthy sprocket delivers consistent resistance throughout the rotation. A worn one creates a repeating pattern where the chain feels tight, then suddenly loose.
- Why it happens: Worn teeth develop high spots and deep grooves. The chain tightens as it rides over a worn tooth peak, then drops into a groove, creating slack.
- Diagnostic trick: Measure the distance between each loose section. If this distance matches the sprocket’s circumference, the sprocket is the culprit, not the chain or bar.
Feel for Jumpy Rotation
Smooth chain movement should feel fluid when turned by hand. A jumpy or jerky sensation indicates uneven sprocket wear. This “catch-and-release” motion damages the chain over time and reduces cutting precision. If the chain jumps even after proper tensioning and with a new chain installed, replace the sprocket immediately to prevent further damage.
Know When to Replace the Sprocket
Follow the Three-Chains Rule
The “three chains” rule is a widely accepted benchmark for maintenance. You should replace the sprocket every time you install your third new chain. While not absolute, this practice prevents mismatched wear between components. A worn sprocket accelerates wear on a new chain, shortening its life and creating poor cutting performance. Replacing related parts together ensures optimal alignment and longevity.
Measure Wear Beyond 0.020 Inches
Visual inspection is not always enough to detect early failure. Use calipers to measure sprocket tooth wear accurately. Once the surface has worn more than 0.020 inches, you must replace the sprocket. At this threshold, the tooth profile is compromised, reducing grip and increasing chain slippage. Ignoring this limit risks severe damage to the clutch and main bearings.
Watch for Tooth Disintegration
Some users run sprockets until teeth are reduced to “toothpicks” or start breaking off entirely. While technically functional, this level of wear poses serious risks to your equipment and safety.
- Increased vibration stresses the crankshaft significantly.
- Fragments can break off and damage the clutch housing.
- New chains wear out prematurely due to poor engagement.
If teeth are visibly hooked, pointed, or chipped, replace the sprocket immediately even if it still turns.
Choose Between Spur and Rim Sprockets
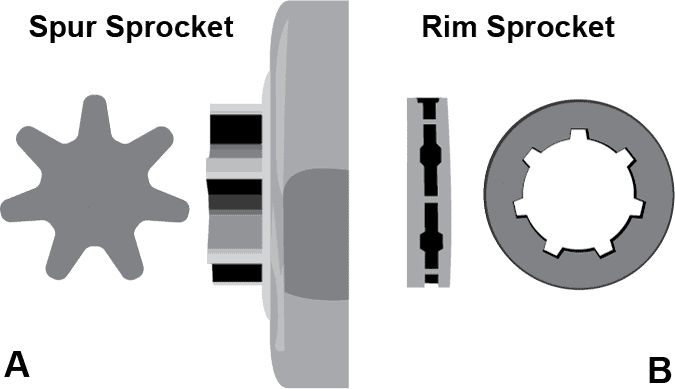
Replace Spur Sprockets as One Unit
Spur sprockets are integrated into the clutch drum as a single piece. When worn, the entire assembly must be replaced. While acceptable for light use, they offer no cost savings over time compared to modular systems. There is no need to replace them prematurely if within wear limits, but once worn, expect to pay more than for a rim system replacement.
- Best for: Occasional users cutting small volumes of firewood.
- Lifespan: Often used until teeth are nearly gone due to higher replacement cost.
Upgrade to Rim Sprockets for Savings
Rim sprockets are modular, meaning only the outer rim is replaced while the inner drum remains. This design offers major advantages for frequent users dealing with chainsaw sprocket problems.
- Lower cost: Rims cost around $3 each, making them very affordable.
- Double lifespan: Flip the rim to use the opposite side for extended life.
- Better alignment: Reduces chain toss, especially in brush or limbing operations.
- Flexible gearing: Swap rims easily, such as using a 7-tooth for torque or 8-tooth for speed.
Though the initial conversion cost equals a new spur sprocket, long-term savings and performance gains make it worthwhile for frequent users.
Fix Loose Rim Fit Issues
Some rim sprockets exhibit a “walking” sensation when pulled by hand. The rim shifts slightly on the clutch housing, which can be alarming. This is not always a defect, but if it locks up at speed, it can cause failure. Causes include worn clutch drive lugs, poor manufacturing tolerances, or debris buildup at the interface. Clean the area thoroughly and check for wear. If the issue persists, consider upgrading to a higher-quality rim or inspecting the clutch housing.
Prevent Premature Sprocket Wear
Maintain Correct Chain Tension
Improper tension is the number one cause of accelerated sprocket wear. A loose chain “pounds” into the sprocket teeth instead of engaging smoothly. This impact wear deepens grooves and rounds off teeth quickly. Always tension the chain so it pulls snug but still moves freely around the bar. Recheck tension after the first few minutes of use, as the chain stretches when hot.
Lubricate the Needle Bearing
The caged needle bearing inside the sprocket requires regular lubrication to function correctly. Without it, heat and friction destroy the bearing, leading to sprocket seizure and crankshaft damage.
- Use white lithium grease: Apply directly to the bearing and sprocket interface.
- Frequency: Lubricate after heavy use or milling sessions.
- Cleaning: Ultrasonic cleaning removes resin and sawdust buildup that accelerates wear.
Neglecting lubrication leads to a rhythmic “thump, thump” during operation. This sound indicates bearing failure that can cascade into engine damage.
Keep Chain and Bar in Good Condition
A dull chain or worn bar nose sprocket increases resistance, forcing the drive sprocket to work harder. This imbalance accelerates wear on all components. Replace or sharpen the chain regularly, and flip or replace the bar to maintain even wear. Ensure oil flow reaches both the bar rails and the sprocket area, as dry operation destroys metal fast.
Replace the Sprocket Step by Step
Remove the Side Cover
Start by removing the two nuts securing the side cover. Lift the cover off to expose the sprocket, clutch, and chain. Place the nuts and cover aside in a clean area. Before disassembly, ensure the chain brake is disengaged so the clutch drum can rotate freely.
Take Off the C-Clip and Washer
Locate the C-clip at the center of the sprocket assembly. Use a flathead screwdriver to gently pry it out of its groove. Set it aside safely, as these clips are small and easily lost. Next, remove the washer above the sprocket. Critical: Note its exact orientation. Most washers are tapered or stamped with a side that must face up. Reinstalling it backward causes misalignment and rapid wear.
Pull Off the Old Sprocket
With the C-clip and washer removed, lift the sprocket or rim off the clutch drum. On some models, you may need to hold the clutch stationary using a clutch lock tool or a piece of wood in the drum slots. Avoid using excessive force. Inspect for binding before prying to prevent damage to the shaft.
Install the New Sprocket
Slide the new sprocket onto the drum. New units have a smooth, ungrooved surface, which ensures even chain engagement. Reinstall the washer in the exact same orientation as before. Then, press the C-clip back into place. Use both thumbs to seat it fully in the groove. A partially installed clip can fly off during operation, causing serious damage.
Reassemble and Test
Replace the side cover and tighten the nuts securely. Install the chain and adjust tension correctly. Perform these final checks to ensure success:
- Brake disengaged: Chain should spin freely by hand.
- Smooth rotation: Turn the chain. It should move without binding or jumping.
- No lock-up: If the chain spins briefly then stops, recheck sprocket alignment, washer position, and C-clip seating.
Maximize Sprocket Life with Best Practices

Replace Sprocket with New Chain
Always replace the sprocket when installing a new chain, especially if the old sprocket shows any wear. A new chain on a worn sprocket will quickly adopt the same grooves and uneven profile, shortening its life. This pairing ensures optimal performance and protects your investment from premature failure.
Inspect Beyond the Three-Chains Rule
While the “three chains” rule is helpful, do not rely on it blindly. Use these real-world checks to determine condition:
- Visual inspection: Look for deep grooves or hooked teeth.
- Tension test: Rotate the chain and feel for tight-loose cycles.
- Measurement: Use calipers to confirm wear is under 0.020 inches.
Field conditions vary. Long bars, heavy milling, or poor lubrication accelerate wear beyond standard expectations.
Upgrade to High-Quality Sprockets
Consider American-made sprockets like the 6K brand for heavy-duty use. Though 4 to 5 times more expensive, they last significantly longer and maintain tooth integrity under stress. For professionals or millers, the cost is justified by reduced downtime and fewer replacements.
Troubleshoot Persistent Sprocket Issues
Rule Out Clutch and Crankshaft Problems
If a new sprocket does not fix the issue, the problem may lie deeper in the powerhead. Rim sprockets may “walk” on a worn clutch housing, creating eccentric rotation. In rare cases involving older models like early MS261s and MS362s, a bent crankshaft or knocked bearings can cause misalignment. If the saw still exhibits eccentric rotation after sprocket replacement, have the clutch and crankshaft inspected by a technician.
Confirm It’s Not Chain or Bar Wear
Before condemning the sprocket, test with a known-good chain and bar. If the tight-loose cycle disappears, the original chain or bar was the issue. Uneven drive link wear or a warped bar can mimic chainsaw sprocket problems. Isolate variables by swapping components one at a time to find the root cause.
Frequently Asked Questions About Chainsaw Sprockets
How often should I replace my chainsaw sprocket?
You should generally replace the sprocket every time you use three chains. However, you must also replace it if wear exceeds 0.020 inches or if you notice a tight-loose cycle when rotating the chain manually.
What is the difference between spur and rim sprockets?
Spur sprockets are one-piece units requiring full replacement when worn. Rim sprockets have a replaceable outer ring, allowing you to swap just the rim for lower cost and the ability to flip it for double life.
Why does my chainsaw chain feel tight and loose when I turn it?
This sensation indicates uneven wear on the sprocket teeth. As the chain rides over high spots and drops into grooves on the worn sprocket, tension fluctuates rhythmically, confirming the need for replacement.
Can a bad sprocket damage my chainsaw engine?
Yes. A worn sprocket causes vibration and irregular loading that can damage the clutch, main crankshaft bearings, and even the crankshaft itself if left unaddressed for too long.
What lubricant should I use for the sprocket bearing?
Use white lithium grease to lubricate the caged needle bearing inside the sprocket assembly. Apply this regularly, especially after heavy use or milling sessions, to prevent heat buildup and seizure.
Key Takeaways for Fixing Chainsaw Sprocket Problems
Addressing chainsaw sprocket problems early saves money and prevents catastrophic engine damage. Recognize symptoms like chain binding, jumpy rotation, and the tight-loose cycle to diagnose wear before it escalates. Replace your sprocket every three chains or when wear exceeds 0.020 inches to maintain optimal performance.
Upgrading to a rim sprocket system offers significant long-term savings and better alignment for heavy users. Always lubricate the needle bearing with white lithium grease and maintain proper chain tension to extend component life. Inspect your setup regularly and swap parts together to ensure a safe, efficient cutting experience.



