
If your STIHL pole saw chain slips under load or fails to cut efficiently, a worn spur sprocket is likely the cause. Replacing this component requires precise attention to the washer stack order to prevent dangerous clutch slippage. This guide explains exactly how to change the sprocket on your STIHL pole saw using verified assembly sequences.
You will learn the correct tool requirements, the specific order for curved washers, and how to tighten the left-hand threaded screw safely. Follow these steps to restore full power to your HT series pole saw without guesswork.
Gather Required Tools and Replacement Parts
Success depends on having the correct OEM components before you begin disassembly. Using aftermarket parts often leads to poor fitment and accelerated wear on your drive system.
Essential Replacement Components
- New spur sprocket specific to your STIHL HT model
- Three curved conical washers included with the new kit
- One flat metal washer for the inner stack
- Retaining screw replace this if threads appear damaged
Pro Tip: Always use genuine STIHL parts. Aftermarket sprockets frequently lack the precise tolerances needed for the clutch drum interface.
Necessary Tools for Removal
- Impact screwdriver manual or power driven with correct Torx bit
- Vise-grip pliers to lock the sprocket during removal
- Clean rag for wiping grease and debris
- Small container to organize washers and screws
Warning: Do not attempt this repair with a standard screwdriver. The retaining screw requires significant impact force to loosen safely.
Remove the Old Sprocket Safely
Disassembling the drive head requires securing the internal mechanism to prevent rotation. Failure to lock the system can result in injury or damage to the clutch housing.
Lock the Clutch Mechanism
- Insert a piece of stiff rope into the exhaust port to lock the piston if accessible.
- Alternatively, clamp vise-grip pliers firmly onto the outer teeth of the old sprocket.
- Ensure the tool prevents any clockwise or counter-clockwise movement before applying force.
Loosen the Retaining Screw
- Fit your impact driver with the correct bit, typically a Torx T27.
- Position the driver into the screw head and apply firm pressure.
- Strike the back of a manual impact driver with a hammer or trigger a power impactor.
- Turn the tool clockwise to loosen the screw due to its left-hand thread design.
Common Mistake: Turning counter-clockwise will tighten the screw further. Remember that left-hand threads loosen when turned right.
Once the screw breaks free, remove it carefully and place all components in your container. Inspect the screw head for stripping before proceeding.
Identify Correct Washer Stack Order
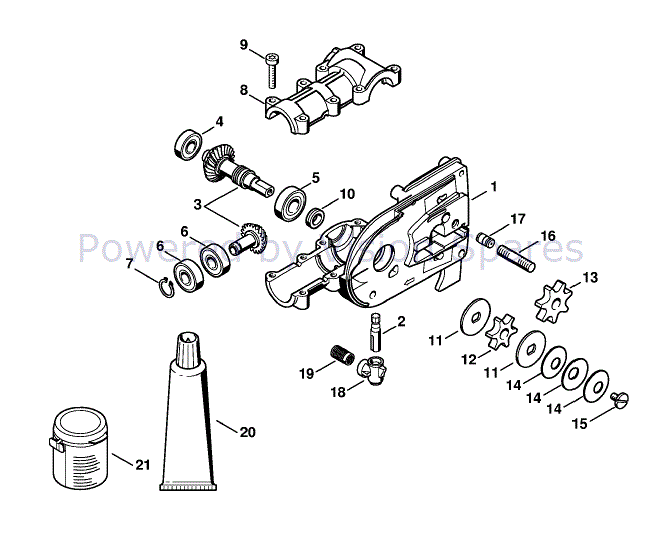
The most critical step in this repair is arranging the washers correctly. An incorrect stack causes the sprocket to spin freely without driving the chain.
Verified Assembly Sequence
Based on official parts diagrams and user verification, the order from the chain side outward is:
1. Spur sprocket sits directly on the shaft
2. Flat washer placed immediately behind the sprocket
3. First curved washer with convex side facing outward
4. Second curved washer with concave side facing the previous washer
5. Third curved washer acting as the final spring lock
6. Retaining screw compresses the entire stack
Visual Cue: The curved washers alternate direction to create a spring-loaded locking system. This looks like ) ( ) when viewed from the side.
Why Three Curved Washers Matter
Some users attempt repairs with only two curved washers, but STIHL HT series models require three. The third washer provides essential clamping force to handle vibration.
Critical Note: Skipping washers reduces tension. This leads to heat buildup, sprocket spin, and potential clutch failure during operation.
Install the New Sprocket Correctly
Proper installation ensures your pole saw delivers maximum cutting power without slippage. Follow this sequence strictly to align the drive components.
Step-by-Step Installation Process
- Slide the new spur sprocket onto the drive shaft with teeth facing out.
- Place the flat washer flush against the back of the sprocket.
- Add the first curved washer with its convex side touching the flat washer.
- Insert the second curved washer so its concave side faces the first curved washer.
- Complete the stack with the third curved washer oriented convex outward.
- Thread the retaining screw by hand until it contacts the washers.
Visual Check: Ensure no washers are tilted or gaping. The stack should look uniform before tightening.
Final Tightening Technique
- Clamp vise-grip pliers on the sprocket teeth to prevent rotation.
- Engage your impact driver with the retaining screw.
- Turn clockwise to tighten the left-hand thread securely.
- Apply steady impact force until the stack compresses fully.
Warning: Avoid using excessive power tool speed. High torque can deform the thin conical washers or strip the screw threads.
Test for Chain Engagement and Slippage
Verification prevents accidents and confirms your repair was successful. Never skip the testing phase before returning to heavy cutting tasks.
Perform a Dry Run Check
- Reattach the guide bar and chain according to manufacturer specifications.
- Start the pole saw and let it idle briefly.
- Rev the engine to engage the clutch without touching wood.
- Observe the sprocket area for any wobble or unusual movement.
Conduct a Load Test in Wood
- Select a small log or thick branch for your first cut.
- Apply moderate pressure while monitoring chain speed.
- Listen for grinding noises that indicate binding.
- Confirm the chain maintains speed under load without slipping.
Success Indicator: As verified by experienced users, a correct installation results in zero slippage and smooth cutting action immediately.
Prevent Future Sprocket Issues
Extending the life of your new sprocket requires consistent maintenance habits. Neglecting these areas leads to premature wear and repeat repairs.
Maintain Proper Oil Flow
- Check oil output before every use by running the saw over a clean surface.
- Look for a distinct line of oil spray indicating clear channels.
- Clean clogged oil ports annually with brake cleaner to ensure lubrication.
Maintenance Tip: A dry chain stretches rapidly and destroys sprocket teeth. Adequate oiling is your primary defense.
Inspect Chain Tension Regularly
- Check tension when the chain is cold to ensure accuracy.
- Adjust so the chain snaps back against the bar but still pulls freely.
- Replace the chain, bar, and sprocket as a matched set when wear appears.
Troubleshoot Common Post-Replacement Issues
Even with careful assembly, minor issues can arise. Use these diagnostics to resolve problems quickly.
Chain Slipping Under Load
- Cause: Incorrect washer orientation or insufficient tightening.
- Solution: Disassemble the head and verify the ) ( ) washer pattern. Retighten with an impact driver.
Sprocket Wobble or Noise
- Cause: Debris trapped in the housing or a bent shaft.
- Solution: Remove components again and clean all mating surfaces thoroughly.
Screw Will Not Tighten
- Cause: Stripped threads or incorrect screw type.
- Solution: Verify you are using the STIHL-specific left-hand thread screw. Replace if damaged.
Safety Alert: Never reuse a screw with damaged threads. Failure under load can eject the sprocket at high speed.
Frequently Asked Questions About STIHL Pole Saw Sprockets
What is the correct order for STIHL pole saw sprocket washers?
The order from the chain side out is: sprocket, flat washer, curved washer (convex out), curved washer (concave out), and a third curved washer (convex out).
Why does my chain slip after changing the sprocket?
Slippage usually means the curved washers are in the wrong order or missing. The stack must include three conical washers to create enough locking pressure.
Do I need a special tool to remove the sprocket screw?
Yes, you need an impact driver and a bit that fits the screw head, typically Torx T27. The screw is left-hand threaded and very tight.
Can I use aftermarket sprockets on my STIHL pole saw?
It is not recommended. Aftermarket parts often have poor tolerances that cause rapid wear and chain damage. Stick to OEM STIHL parts.
How often should I replace the pole saw sprocket?
Replace the sprocket every time you replace two or three chains. A worn sprocket accelerates chain wear and reduces cutting efficiency.
Key Takeaways for Changing Your STIHL Pole Saw Sprocket
Changing the sprocket on your STIHL pole saw restores cutting power when done with the correct washer sequence. Remember that the stack requires three curved washers arranged in an alternating pattern to function as a lock. Always use an impact driver to handle the left-hand threaded screw safely and effectively.
Perform a load test in wood immediately after assembly to confirm there is no slippage. Regular maintenance of your oiler and chain tension will protect your new sprocket investment. With these steps, your pole saw will perform reliably for years to come.



