
Selecting the wrong sprocket size can ruin your acceleration, strain your engine, and cause premature chain failure. Whether you ride a motorcycle or operate industrial machinery, matching the sprocket to your specific performance goals is essential for drivetrain harmony.
This guide explains exactly how to choose sprocket size by analyzing pitch compatibility, calculating gear ratios, and selecting the right materials. You will learn to diagnose fitment issues, adjust for torque or speed, and avoid common installation errors that lead to costly repairs.
Match Chain Pitch to Sprocket Specifications

The most critical step in how to choose sprocket size is ensuring the chain pitch matches the sprocket pitch exactly. Pitch refers to the distance between the centers of two consecutive chain pins. If these measurements do not align, the chain will skip, wear rapidly, or derail completely.
Verify Chain and Sprocket Compatibility
You must identify your current chain type before purchasing a replacement sprocket. Industrial chains often use ANSI numbering, while motorcycles use specific series codes.
* A #40 chain requires a sprocket with a 0.50-inch pitch.
* A #50 chain needs a 0.625-inch pitch sprocket.
* Motorcycle chains like 520 or 530 indicate both pitch and roller width.
Always check the side plates of your existing chain for stamped size codes. Cross-reference these numbers with ANSI or British Standard (BS) charts to ensure a perfect match.
Use Standardized Size Charts
Referencing a compatibility table prevents expensive mistakes. Even a mismatch of 1/16 inch can destroy components within hours of operation.
| Chain Size (ANSI) | Pitch (Inches) | Common Applications |
|---|---|---|
| 25 | 0.25 | Small conveyors, light duty |
| 40 | 0.50 | Bicycles, small engines |
| 50 | 0.625 | ATVs, industrial drives |
| 60 | 0.75 | Heavy machinery |
| 80 | 1.00 | Industrial equipment |
For metric conversions, note that 08B equals #40 and 10B equals #50. Never force a chain onto a sprocket that does not match these standards.
Calculate Gear Ratio for Desired Performance
Understanding gear ratios is central to knowing how to choose sprocket size for your specific needs. The ratio determines the balance between raw acceleration and top-end speed. You calculate this by dividing the driven sprocket teeth by the drive sprocket teeth.
Determine Your Drive Ratio
For a typical motorcycle setup, divide the rear sprocket teeth count by the front sprocket teeth count.
* Front Sprocket: 15 teeth
* Rear Sprocket: 45 teeth
* Calculation: 45 ÷ 15 = 3.00 Ratio
This result means the engine crankshaft rotates three times for every single rotation of the rear wheel. A higher numerical ratio generally provides more torque.
Adjust for Torque or Speed
Changing the tooth count shifts the power delivery characteristics of your machine.
Increase Rear Sprocket Size
Adding teeth to the rear sprocket increases the gear ratio.
* Result: More torque and faster acceleration.
* Trade-off: Lower top speed and higher engine RPM at cruising speeds.
* Best For: City riding, off-road trails, and hill climbing.
Decrease Rear Sprocket Size
Removing teeth from the rear sprocket lowers the gear ratio.
* Result: Higher potential top speed and lower engine RPM.
* Trade-off: Slower acceleration from a stop.
* Best For: Highway touring and fuel economy.
Changing the front sprocket has a more dramatic effect per tooth than changing the rear. A smaller front sprocket acts like a larger rear one, while a larger front sprocket tallens the gearing.
Analyze Tooth Count Impact on Tuning
When deciding how to choose sprocket size for fine-tuning, start with your stock configuration as a baseline. Small changes yield noticeable results without requiring major mechanical modifications.
Use Baseline Ratios for Tuning
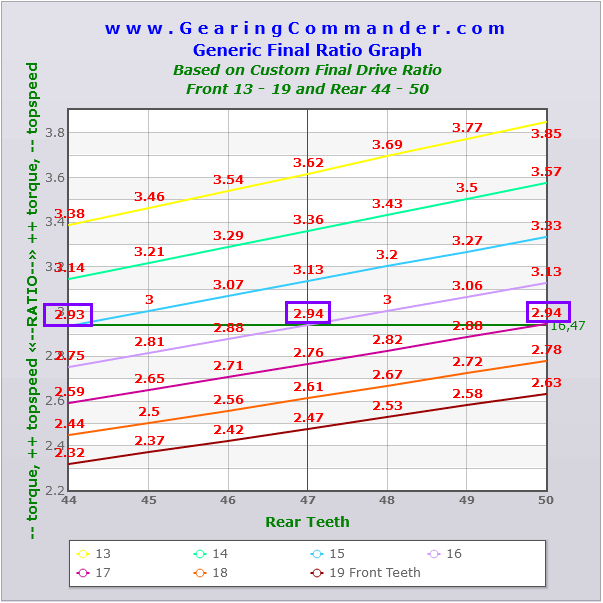
Consider a baseline setup with a 13-tooth front and 46-tooth rear sprocket. The following changes illustrate the impact of adding rear teeth:
| Rear Teeth | Gear Ratio | Torque Change | Speed Change |
|---|---|---|---|
| 46 (Base) | 3.54 | 0% | 0% |
| 47 | 3.62 | +2.1% | -2.1% |
| 49 | 3.77 | +2.0% | -2.0% |
| 50 | 3.85 | +4.0% | -4.0% |
| 52 | 4.00 | +7.7% | -7.7% |
Each additional tooth on the rear sprocket typically increases torque by approximately 2 percent. A change of plus or minus two to three teeth is usually sufficient to feel a distinct difference in performance.
Avoid Extreme Gearing Changes
Drastic changes can cause mechanical issues. Going too low may cause engine lugging, while going too high risks overspeeding.
* Stay within ±5 teeth on the rear sprocket.
* Stay within ±2 teeth on the front sprocket.
Extreme changes may cause the chain to rub against the frame or exceed the adjustment range of your swingarm.
Check Physical Fit and Clearance Limits
Knowing how to choose sprocket size also involves physical dimensions. A sprocket with the correct tooth count might still be too large to fit inside your frame or swingarm.
Measure Pitch Diameter for Installation
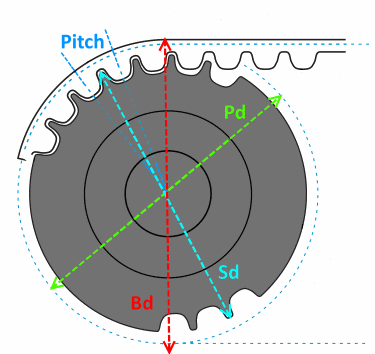
The pitch diameter determines how far the chain sits from the shaft center. You can calculate this using the formula: Pitch Diameter = Pitch / sin(180° ÷ Number of Teeth).
- A 15-tooth #40 sprocket has a pitch diameter of 2.405 inches.
- A 40-tooth #50 sprocket has a pitch diameter of 9.559 inches.
Ensure the new sprocket clears the frame, swingarm, and any chain guards. The chain must align perfectly with the counterpart sprocket to prevent uneven wear.
Confirm Outside Diameter Limits
The outside diameter measures the very tips of the teeth. Larger sprockets increase this dimension significantly.
* Verify there is no contact with surrounding parts during suspension compression.
* Check if a longer chain is required to accommodate the larger circumference.
* Inspect if the chain guard needs relocation or replacement.
Select Correct Sprocket Type and Mounting

The final step in how to choose sprocket size involves selecting the correct mounting style and row configuration for your application.
Choose by Chain Configuration
Sprockets come in single, double, and triple row designs.
* Simplex (1-row): Used in 70 percent of applications like bicycles and light machinery.
* Duplex (2-row): Required for higher torque loads.
* Triplex (3-row): Reserved for heavy industrial systems.
Check your chain code for suffixes like -1, -2, or -3. Using a simplex sprocket with a duplex chain will cause immediate misalignment and failure.
Match Mounting Style to Shaft
Different applications require specific mounting methods.
* Pilot Bore: Common on bikes. The hub is drilled to fit a specific shaft diameter and secured with a grub screw.
* Taper Bush: Standard in industry. Uses a split bushing to clamp onto the shaft, allowing for easy size changes without custom drilling.
* Bolt Pattern: Motorcycle rear sprockets must match the wheel hub bolt circle diameter and offset exactly.
Always verify OEM specifications for bore size, keyway dimensions, and bolt patterns before purchasing.
Choose Material for Durability Needs
Material selection dictates the lifespan and weight of your drivetrain. Understanding material properties helps you choose sprocket size and type that fits your usage patterns.
Steel for Longevity and Strength
Standard steel sprockets are the default choice for most users. They offer excellent resistance to wear and are affordable. This material is ideal for daily-driven motorcycles, agricultural equipment, and industrial machinery where reliability is paramount.
Hardened or Chrome-Plated Steel
For extended service life, consider hardened or chrome-plated options. These components can last two to three times longer than standard steel. They provide superior resistance to corrosion and abrasion, making them worth the investment for high-mileage vehicles or harsh environments involving mud and salt.
Aluminum for Weight Savings
Racers often choose aluminum sprockets to reduce unsprung weight. While this improves acceleration slightly and looks impressive, aluminum wears three to five times faster than steel. Do not use aluminum for daily driving or heavy loads unless you prioritize weight reduction over longevity.
Inspect for Wear and Replacement Signs
Regular inspection ensures your chosen sprocket size continues to perform safely. Worn components can damage new parts and compromise safety.
Identify Worn Sprocket Teeth
Examine the shape of the teeth tips regularly.
* Healthy Teeth: Tips appear blunt and rounded.
* Worn Teeth: Tips become sharp, hooked, or resemble shark fins.
If you notice uneven wear across the face of the teeth or experience chain skipping under load, replacement is necessary immediately.
Replace Chain and Sprockets Together
Never install a new chain on worn sprockets. The mismatched profiles will cause rapid stretching and noise. Always replace the chain and sprockets as a set to ensure maximum lifespan and smooth operation. Mark your installation date to track wear over time.
Adjust Chain Tension After Changes
Changing sprocket size alters the required chain length and tension. Proper adjustment is vital after any modification.
Re-Tension After Sprocket Swap
Installing a larger rear sprocket increases chain slack, requiring you to move the rear wheel forward. Conversely, a smaller sprocket tightens the chain, requiring the wheel to move backward.
* Motorcycles: Aim for 1.25 to 1.75 inches of slack at the midpoint.
* Industrial Drives: Follow specific manufacturer tension guidelines.
Check Alignment
Misaligned sprockets cause accelerated wear and noise. Use a straight edge or laser tool to ensure both sprockets lie in the same plane. Measure the distance from the swingarm to the sprocket edge on both sides to verify accuracy.
Optimize for Your Riding or Operating Style

Your specific usage scenario dictates how to choose sprocket size effectively. Tailor your setup to match your primary riding conditions.
City and Commuter Use
Prioritize strong low-end acceleration for frequent stops. Add one to three teeth to the rear sprocket or remove one from the front. This setup reduces clutch manipulation and improves hill climbing ability.
Highway and Touring
Focus on smooth cruising at lower RPM. Remove one to two teeth from the rear or add one to the front. This reduces engine vibration and improves fuel efficiency during long-distance travel.
Off-Road and Trail Riding
Maximize traction and control in difficult terrain. Add two to four teeth to the rear sprocket. This provides the torque needed for crawling and reduces the throttle input required for technical sections.
Track and Sport Riding
Optimize exit speed and powerband usage. Experiment with combinations like adding one rear tooth and removing one front tooth. Pair this with lightweight aluminum sprockets if weight savings are critical for your lap times.
Frequently Asked Questions About Sprocket Selection
How does changing sprocket size affect top speed?
Increasing the rear sprocket size or decreasing the front sprocket size lowers your top speed while increasing acceleration. Conversely, decreasing the rear size or increasing the front size raises top speed potential but reduces acceleration.
Can I change just the sprocket without changing the chain?
No. You should never install a new chain on worn sprockets or vice versa. Mismatched wear patterns cause rapid failure. Always replace the chain and sprockets as a complete set.
What is the difference between pitch diameter and outside diameter?
Pitch diameter is the effective working circle where the chain engages the teeth. Outside diameter is the measurement across the very tips of the teeth. Pitch diameter determines gear ratio, while outside diameter determines physical clearance.
How many teeth can I safely add to my rear sprocket?
Generally, you can safely add or remove up to five teeth on the rear sprocket and two teeth on the front. Exceeding these limits may cause chain rubbing, insufficient tension adjustment, or engine lugging.
Does aluminum sprocket material last as long as steel?
No. Aluminum sprockets wear three to five times faster than steel. They are designed for weight reduction in racing applications, not for long-term durability in daily use.
Key Takeaways for Choosing Sprocket Size
Selecting the right sprocket involves balancing pitch compatibility, gear ratio goals, and physical constraints. By matching your chain pitch exactly and calculating the ideal tooth count for your riding style, you can significantly improve performance and component life. Remember to always replace chains and sprockets together and verify clearance before installation.
Take action today by inspecting your current drivetrain and calculating your existing gear ratio. Use the charts and formulas provided to plan a modification that aligns with your specific performance goals.



