
You have a custom project like a go-kart or conveyor, but the chain fits while the sprocket does not exist. Learning how to make a chain sprocket solves this problem using basic math and tools rather than factory orders.
This guide explains exact pitch calculations, ANSI profile standards, and manual cutting methods to build a durable part. You will discover how to measure your chain accurately and fabricate a custom sprocket that runs smoothly without binding.
Identify Exact Chain Pitch and Roller Size
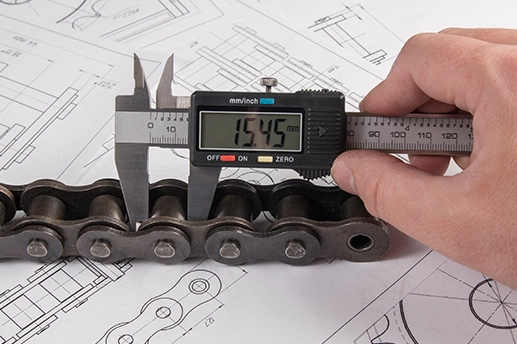
Success depends on measuring your specific chain type before drawing any lines. A mismatch in pitch or roller size causes immediate failure or rapid wear on your new part.
Measure Pitch Across Multiple Links
Do not rely on stamped labels or single-link measurements which often contain errors. Measure across 10 or more links with calipers and divide by the number of spaces to find the true average.
* Common #40 chain measures 0.500 inches per pitch.
* Metric labeled chains often use inch dimensions internally.
* Verify every measurement twice before proceeding to design.
Determine Roller Diameter Values
The roller diameter dictates the curvature of the tooth seating area. Standard roller sizes vary significantly between chain series like #25, #35, and #40.
* #25 chain rollers measure 0.13 inches.
* #35 chain rollers measure 0.20 inches.
* #40 chain rollers measure 0.219 inches.
Calculate Pitch Diameter Using Chordal Math
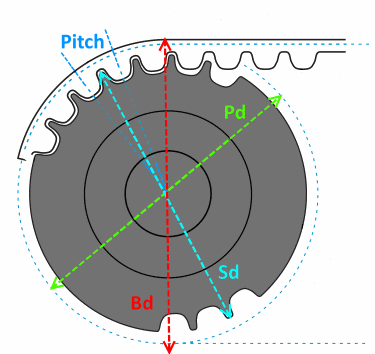
Standard gear formulas fail here because chains fold around a polygon rather than wrapping a smooth circle. You must use the cosecant method to find the correct Pitch Diameter (PD).
Apply the Cosecant Formula
The PD represents the circle that passes through the centers of the chain rollers when seated. Calculate it by multiplying the chain pitch by the cosecant of 180 degrees divided by the tooth count.
* Formula: $PD = pitch \times \csc(180^\circ / teeth)$
* A 12-tooth sprocket for #40 chain yields a 1.932 inch PD.
* Never substitute arc length formulas for this chordal calculation.
Establish Outer Diameter Limits
The Outer Diameter (OD) defines the maximum width of your sprocket including the tooth tips. Most robust designs add half the pitch to the Pitch Diameter to create flat-tipped teeth.
* Formula: $OD = PD + (pitch / 2)$
* This dimension sets the boundary for your raw material stock.
* Flat tips increase strength compared to sharp pointed alternatives.
Select ANSI Profile Over Standard Hob
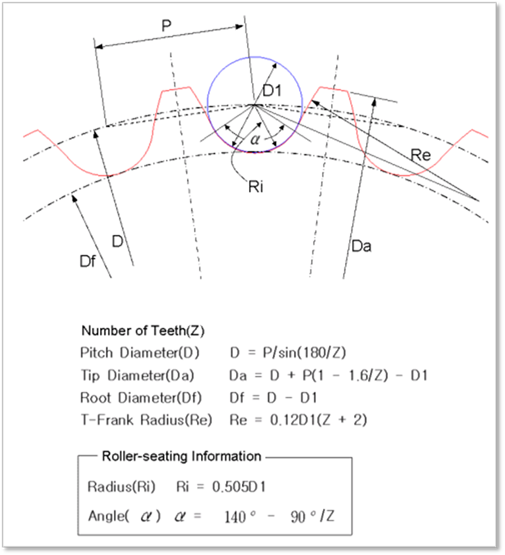
Your choice of tooth profile determines how well the chain engages and disengages under load. The ANSI standard offers superior clearance and durability for most custom applications.
Compare Profile Complexity
Standard Hob profiles simulate a simple cutting path while ANSI uses multi-radius curves for precision. ANSI profiles provide generous entry and exit clearance that reduces friction.
* Standard Hob suits low-load prototypes or simple fixes.
* ANSI delivers high wear resistance for performance builds.
* Better clearance prevents the chain from binding during rotation.
Compute Seating Curve Diameter
The seating curve is the specific arc where the chain roller rests on the tooth. You must make this curve slightly larger than the roller itself to prevent tight binding.
* Formula: $D_s = (1.005 \times Roller Diameter) + 0.003$ inches.
* This tiny clearance allowance ensures smooth rolling action.
* Ignoring this factor causes the chain to jam in the tooth space.
Design One Tooth Space in CAD Software
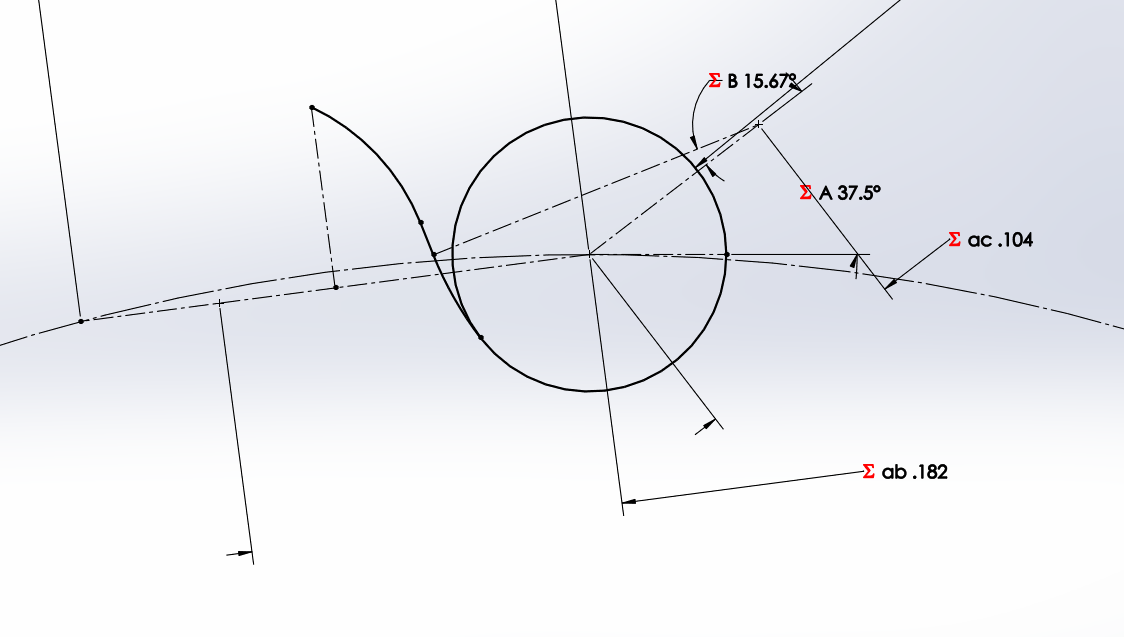
Parametric software like Fusion 360 allows you to build a single accurate tooth and pattern it around the center. This method ensures every tooth is identical and mathematically correct.
Construct Base Geometry
Start by drawing the Pitch Diameter circle and placing a chord equal to the chain pitch on its circumference. Add circles representing the roller and the calculated seating curve at the chord endpoints.
* Set the chord length exactly equal to your measured pitch.
* Place the seating curve circle tangent to the roller simulation.
* Use construction lines to define the center axis of the tooth gap.
Apply ANSI Angular Constraints
Build the flank of the tooth using specific angles derived from the tooth count. Angle A controls the top flank while Angle B shapes the root clearance area.
* Angle A equals 35 degrees plus 60 divided by tooth count.
* Angle B equals 18 degrees minus 56 divided by tooth count.
* Dimension distances relative to the roller diameter for accuracy.
Generate Full Sprocket Model and Features
Turn your single tooth profile into a complete 3D part by extruding the blank and patterning the cut. Add necessary chamfers to guide the chain onto the sprocket face.
Extrude Blank to Chain Width
Create a solid cylinder using your Outer Diameter and extrude it to match the internal width of your chain. Standard widths vary from 0.11 inches for #25 up to 0.30 inches for #40.
* Sketch the OD circle on your working plane.
* Extrude to the precise internal width of the chain links.
* Ensure the material thickness exceeds the chain width slightly.
Pattern Teeth and Add Chamfers
Cut one tooth space using your profile sketch then use a circular pattern to replicate it around the center axis. Add a chamfer to the outer edge to help the chain slide on easily.
* Pattern quantity equals your total number of teeth.
* Chamfer width should be one-eighth of the chain pitch.
* Chamfer height should be half of the chain pitch value.
Fabricate Without CAD Using Drill Method
You can build a functional sprocket manually if you lack access to CNC machines or 3D software. This approach relies on a paper template and careful drilling.
Create and Attach Paper Template
Draw the pitch circle and tooth spaces on paper using your calculated dimensions. Glue this template securely to your metal stock to guide your drilling operations.
* Mark tooth centers evenly around the pitch circle.
* Ensure the paper lies flat with no wrinkles or bubbles.
* Use the template to locate drill start points accurately.
Drill and File Tooth Gaps
Drill a series of overlapping holes along the lines where material needs removal. Use files to smooth the jagged edges and refine the tooth shape to match your template.
* Choose a drill bit slightly smaller than the gap width.
* File the flanks until the chain roller sits freely.
* Test fit the chain frequently during the filing process.
Cut Precision Teeth With Rotary Table
A milling machine with a rotary table offers the best balance of speed and accuracy for custom sprockets. This setup allows you to mill precise gaps between teeth repeatedly.
Setup Rotary Indexing
Mount your material blank on the rotary table and align it perfectly with the spindle. Calculate the angular increment by dividing 360 degrees by your tooth count.
* Use an edge finder to center the blank accurately.
* Set the dividing plate for your specific tooth count.
* Secure the workpiece firmly to prevent movement.
Mill Each Tooth Gap
Move the end mill to the start of a tooth gap and plunge to the required depth. Mill across the gap then retract and rotate the table to the next position.
* Repeat the cut for every tooth space around the circle.
* Use coolant to prevent the metal from work hardening.
* Check alignment after the first few cuts to ensure consistency.
Modify Existing Sprockets for Custom Pitches
Sometimes modifying a commercial sprocket is faster than making one from scratch. You can alter tooth depth or remove teeth to match non-standard requirements.
Deepen Roots to Reduce Effective Pitch
Cutting the root diameter deeper moves the contact point inward. This effectively reduces the pitch diameter allowing a standard sprocket to fit a slightly smaller pitch chain.
* Cut slowly and test fit the chain after each pass.
* Do not undercut so deeply that the teeth become weak.
* This works well for pitches close to standard sizes.
Create Skip-Tooth Patterns
Remove every other tooth from a standard sprocket to create a skip-tooth design for vintage chains. This converts a 14-tooth sprocket into a 7-tooth skip pattern instantly.
* Buy a sprocket with double your target tooth count.
* Machine off alternate teeth carefully to avoid damaging neighbors.
* Deburr all cut surfaces before installing on your project.
Troubleshoot Fit and Performance Issues

Even a well-calculated sprocket may need adjustment if installation or alignment is poor. Diagnose common problems like jumping or noise by checking these key areas.
Resolve Chain Jumping or Skipping
Jumping usually indicates a pitch mismatch or shallow tooth depth. Re-verify your pitch diameter math and ensure the chain is tensioned correctly.
* Check that the seating curve diameter is not too small.
* Inspect for misalignment between shafts.
* Increase tooth depth if the chain rides too high.
Eliminate Binding and Noise
Binding often results from a seating curve that is too tight or missing chamfers. Noise may stem from chordal action which is normal on small sprockets.
* Recalculate seating diameter using the 1.005 factor.
* Add chamfers to the tooth tips if they are sharp.
* Use a larger sprocket to smooth out rotation if possible.
Frequently Asked Questions About Chain Sprockets
Can I use standard gear formulas for sprockets?
No, you must use the cosecant formula because chains wrap around a polygon not a circle. Gear formulas assume continuous contact which causes pitch errors in chain drives.
Why does my custom sprocket bind the chain?
Binding usually happens when the seating curve diameter equals the roller diameter exactly. You must add the 0.003 inch clearance factor to allow smooth rotation.
What is the difference between Hob and ANSI profiles?
ANSI profiles have complex multi-radius curves that offer better clearance and life. Hob profiles are simpler arcs suitable for low-load or prototype applications only.
How do I find the pitch of an unlabeled chain?
Measure the distance across 10 or more links and divide by the number of spaces. This average reduces measurement error compared to measuring a single link.
Can modern chains run on skip-tooth sprockets?
Yes, modern roller chains often work on skip-tooth sprockets if the pitch matches the original design. Ensure the remaining teeth are strong enough for your load.
Key Takeaways for Making a Chain Sprocket
Building a functional chain sprocket requires precise math and attention to clearance details. Remember to always use the cosecant formula for pitch diameter and oversize the seating curve by 0.003 inches to prevent binding.
Select the ANSI profile for any application requiring durability and choose modification over fabrication when possible to save time. Measure your chain pitch across multiple links to ensure your custom part fits perfectly on the first try.



