
A chainsaw chain brake is one of its most critical safety features, yet it’s often misunderstood, misassembled, or neglected until failure. When your chainsaw brake won’t disengage, activates randomly, or fails to stop the chain during kickback, you’re facing a serious safety risk. This guide covers diagnosis, reset procedures, brand-specific repair steps, and maintenance for Stihl, Husqvarna, and Echo models so you can restore safe operation yourself.
You’ll learn how to identify failure causes, reset a stuck brake using safe methods, disassemble and reassemble internal components correctly, and test your repair before starting the saw. Every section includes troubleshooting tips, common mistakes to avoid, and the exact tools you need.
Diagnose Chain Brake Problems Before Disassembly
Before taking anything apart, identify the actual cause. Most brake issues stem from debris buildup, misalignment, or worn springs rather than total component failure. A proper diagnosis saves time and prevents unnecessary part replacement.
Check for Debris and Binding
Sawdust, pitch, and oil residue accumulate under the spring steel band, around pivot points, and inside gear housings. This gunk prevents smooth movement and can lock the brake in the engaged position.
Signs of debris buildup include a brake lever that won’t move, a cover that won’t seat properly, or a chain that won’t turn even when the engine is running. Remove the clutch cover and inspect the brake band and actuation link area closely. Clean thoroughly with Spray 9 degreaser and compressed air. Never use white lithium grease or sticky lubricants because they trap more debris and make the problem worse.
Test Manual Lever Movement
Push the front hand guard forward manually to test engagement. If it moves smoothly and locks with an audible click, the mechanism may be functional. If it’s stiff, loose, or doesn’t return to the starting position, suspect spring misalignment, a broken return spring, or a missing C-clip.
A brake that engages but won’t release usually means the binder strap is still contracted. You must reset it before reassembly or the cover won’t fit properly.
Reset a Stuck Chain Brake Safely
A brake stuck in the engaged position is common after maintenance or long-term storage. Resetting it improperly risks injury from high-tension springs. Use this safe method to restore proper function.
Universal Wrench Reset Method
- Reinstall the clutch cover loosely by inserting all four screws but leaving them hand-loose. This contains spring energy safely.
- Use a 9/16-inch open-end wrench and fit it over two of the three gear teeth on the brake mechanism.
- Insert a Phillips screwdriver through the wrench box end to act as a lever arm for controlled torque.
- Rotate clockwise until you hear a distinct snap. That click means the internal spring has reset and the brake is now disengaged.
- Verify by checking that the top-hand guard moves freely forward and the brake band is expanded and able to slide over the clutch drum.
Never attempt this with bare hands. High-tension springs can cause severe injury if they release unexpectedly.
Husqvarna-Specific Reset Procedure
Some Husqvarna models like the 36 and 41 use an actuation link visible through the cover. Locate the link and rotate it clockwise until it stops. Ensure the bottom arm is pointing down, which confirms correct reset. Reassemble immediately to prevent accidental re-engagement.
Disassemble Your Chainsaw Brake by Brand
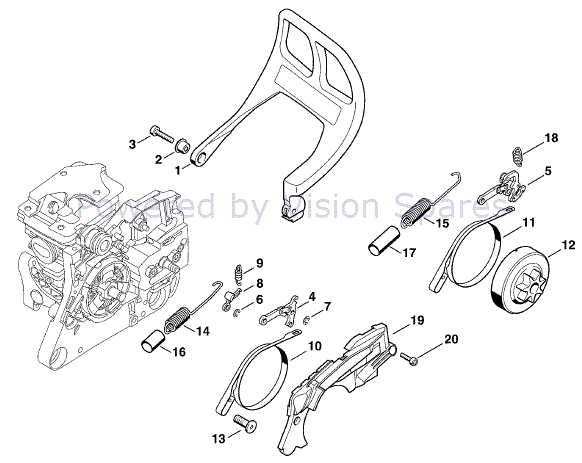
Each brand uses slightly different retention systems and internal layouts. Know your model before starting.
Stihl Models (MS 270, 271, 291)
Remove the chain, bar, and clutch cover first. Clean the exterior with compressed air, then remove the two Torx screws securing the side cover. On some models, a metal shield hides the internal mechanism, so remove it first.
Extract the brake assembly by releasing the tension spring from its housing hook. Note the routing carefully because reinstallation is tricky. Use needle-nose pliers to unhook the brake band, then remove the C-clip. Caution: it can fly off under spring tension. Gently pull the handle and brake unit off the mounting posts.
A small groove piece inside the housing must be installed in the correct orientation. If reversed, the spring won’t engage the actuation link and the brake will fail to reset.
Echo Models (P021017220 Kit)
Echo uses modular replacement kits where cleaning isn’t always necessary and replacement is often faster. Remove the guide bar, chain, and brake cover, then pull out the bolt-adjuster pin and remove the bevel gears.
Transfer both bevel gears and the adjuster pin to the new housing. These ensure proper chain tensioning and bar alignment. Skipping this step leads to misaligned tension and poor chain tracking. Secure the new brake assembly with the included screw and reinstall the metal guard if present.
Husqvarna General Procedure
Use Torx or Allen wrenches depending on your model year. Early models resemble Stihl with C-clips, multi-form springs (PN: 530 01 59-01), and actuation links (PN: 501 87 53-01). On electronic models like the T540i XP, test sensor continuity with a multimeter before assuming a mechanical failure.
Common failure points include a worn brake band under 1.0 mm thick, seized pivot points from oil-gum buildup, and misaligned actuation links.
Reassemble Brake Components Correctly
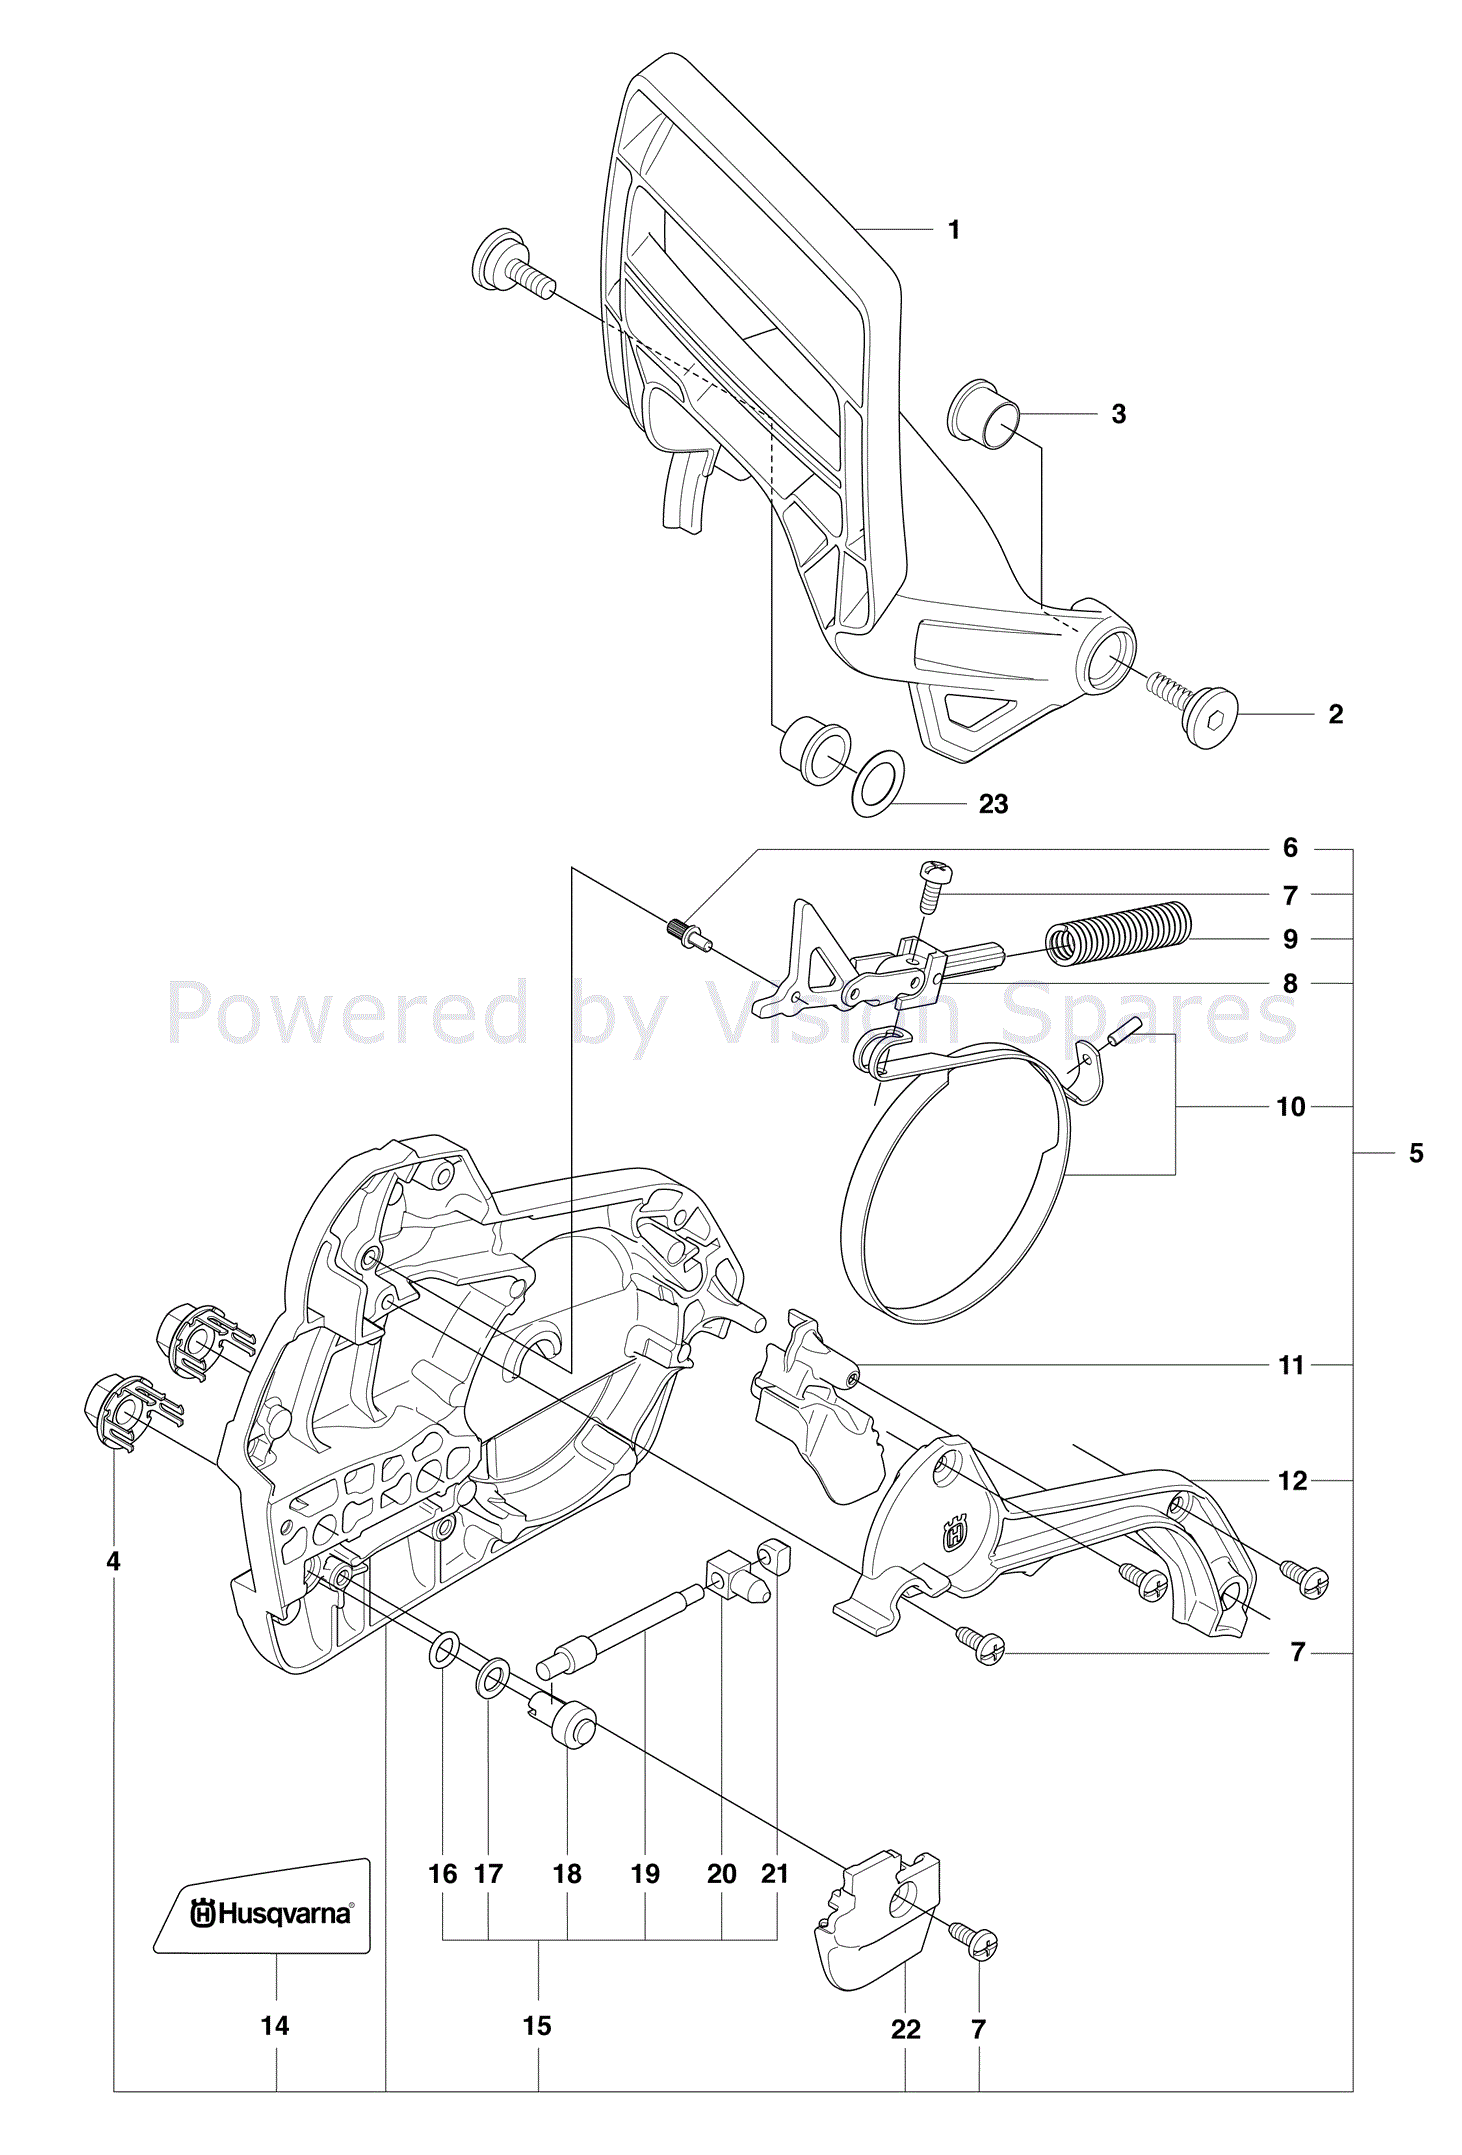
One misaligned spring or flipped groove piece ruins the entire repair. Follow these steps precisely.
Align the Actuation Link and Spring
The nipple on the actuation link must seat into the groove on the cover. This ensures force transfers from the hand guard to the brake band during kickback. The right end (bitter end) of the multi-form spring must interface correctly with the actuation link. The spring pivots at the same point as the brake handle, so any offset prevents reset.
Position the Brake Handle Rearward
Before installing the cover, push the hand guard fully back. This keeps the internal mechanism under tension and ensures the binder strap expands. Installing with the handle forward means the strap stays retracted and the cover won’t fit.
Test Before Final Tightening
Move the lever forward and back. It should travel smoothly with a distinct click when engaged. If it binds at any point, stop immediately and disassemble to check for debris or misalignment.
Lubricate Moving Parts Properly
Proper lubrication prevents future sticking, but using the wrong product causes more problems.
Use Dry, Non-Residue Lubricants
Apply Release Off or silicone spray to the inner surface of the spring steel band, all pivot points and linkages, the Teflon washer (18-20mm ID), and gear teeth interfaces. A little goes a long way.
Never lubricate the brake band or clutch drum surface. Oil combined with sawdust creates an abrasive paste that dramatically reduces braking power. Wipe contact surfaces with isopropyl alcohol to remove any oil residue before reassembly.
Adjust Chain Tension After Brake Repair
A misadjusted chain can mimic brake problems and cause you to troubleshoot the wrong system.
Correct Tension Guidelines
At the bar center, the chain should have slight slack, just enough to expose the inner edge of the cutting teeth. At the nose, the chain must not pull out of the groove. Over-tightening distorts the bar and strips plastic threads.
Loosen the clutch cover nuts slightly, then turn the adjuster screw through the cover hole until tension is correct. Snug the nuts hand-tight only, then recheck after 5 minutes of operation.
Test Brake Function Thoroughly
Never start the saw without verifying brake operation. Skipping this step risks serious injury.
Manual Engagement Test
Remove the spark plug for safety. Place the saw on a stable surface, then push the hand guard forward. Check that the lever moves smoothly, you hear an audible click, and the clutch drum cannot be turned by hand. Release the lever and verify the drum spins freely.
If the drum turns when the brake is engaged, recheck band alignment and spring tension.
Low-Speed Operational Test
Reconnect the spark plug and start the saw outdoors in a clear area. Let it idle, then engage the brake gently. The chain should stop instantly. Release and the chain should resume spinning. Repeat this 3-5 times.
Listen for grinding (misalignment) or squealing (debris). Feel for stiff or loose lever action. Inspect for overheating after repeated use. Pass criteria are instant engagement, firm hold, clean release, and no noise.
Troubleshoot Common Brake Issues
| Symptom | Likely Cause | Fix |
|---|---|---|
| Brake won’t disengage | Debris, unreset band | Clean thoroughly, reset with wrench |
| Chain stalls under load | Partial engagement | Verify full disengagement |
| Lever won’t move | Spring misaligned | Recheck multi-form spring |
| Random engagement | Loose pivot, worn parts | Tighten fasteners, replace parts |
| Cover won’t fit | Band still engaged | Reset brake before install |
| No engagement | Broken spring, worn band | Replace assembly |
| Brake sticks | Debris, bent band | Clean, realign, replace |
| Loose lever | Missing C-clip | Replace linkage |
| Chain slips when braked | Glazed drum, oil contamination | Clean drum, replace band |
| Grinding noise | Misaligned band | Inspect and realign |
Maintain Your Brake for Long-Term Reliability
A well-maintained brake lasts years. Follow these habits to avoid repeat repairs.
Cleaning Schedule
Remove the bar and inspect the brake band every 10 hours of use. Blow out debris with compressed air and wipe the clutch drum with alcohol. This simple step prevents most failures.
Inspection Intervals
Inspect springs every 50 hours by measuring the multi-form spring length. Replace if elongated by over 10%. Check for cracks in plastic housing and measure brake band thickness. Replace the band if it’s under 1.0 mm.
Lubrication Rules
Only use dry lubes on moving parts. Never grease the brake band or clutch drum. This is the most common mistake that leads to premature failure.
Know Your Replacement Parts
For Husqvarna models, the multi-form spring is part number 530 01 59-01, the actuation link is 501 87 53-01, and the Teflon washer is 18-20mm ID. Echo uses complete brake assembly part number P021017220. Stihl uses model-specific kits, so check parts diagrams for your exact model.
Use AppliancePartsPros.com or OEM dealers. Match the part number and model exactly to ensure compatibility.
Follow Critical Safety Rules
Always remove the spark plug before working on the brake. Wear gloves and eye protection. Never force disassembly because excessive pressure damages plastic housings and fine threads. Take photos of wiring and sensor connections on electronic models before disconnecting them. Hand-tighten only, especially on plastic housings.
Frequently Asked Questions About Chainsaw Brake Repair
Why does my chainsaw brake stick in the engaged position?
Debris buildup under the spring steel band and around pivot points is the most common cause. Sawdust, pitch, and oil residue create a gummy substance that prevents the band from expanding. Clean all components thoroughly with degreaser and compressed air, then reset the brake using the wrench method before reassembly.
Can I replace just the spring or do I need the whole brake assembly?
You can replace individual components like the multi-form spring, actuation link, or brake band if only one part is worn or damaged. However, if multiple components show wear or the housing is cracked, replacing the entire assembly is more cost-effective and ensures reliable operation.
How do I know if my brake band needs replacement?
Measure the brake band thickness. If it’s below 1.0 mm, replace it immediately. Also inspect the contact surface for a glazed or shiny appearance, which indicates reduced friction. A worn band won’t stop the chain effectively during kickback.
Why does my Husqvarna brake trigger randomly?
False triggering on Husqvarna models often results from misaligned actuation links or inadequate retention of internal linkages. The bottom arm of the link must point downward after reset. Also check for worn pivot points and loose fasteners that allow unwanted movement.
Should I use lithium grease on my chainsaw brake?
Never use lithium grease or any sticky lubricant on brake components. These products trap sawdust and create abrasive paste that interferes with smooth operation. Use only dry, non-residue lubricants like silicone spray or Release Off on pivot points and gear teeth.
How often should I test my chain brake function?
Test the brake manually every time you adjust the chain or remove the bar. Perform a low-speed operational test after any brake repair or after the saw has been sitting unused for an extended period. Regular testing catches problems early before they become safety hazards.
Key Takeaways for Chainsaw Brake Repair Success
The chain brake is your primary defense against kickback injuries, so reliable function is non-negotiable. Always clean debris thoroughly before reassembly because buildup is the number one cause of failure. Reset the brake using the wrench method before installing the cover to ensure the binder strap is expanded. Align the actuation link and multi-form spring precisely because misalignment prevents proper engagement and reset. Transfer all adjustment components when replacing Echo brake housings to maintain correct chain tension. Test manually and at low speed before full operation to verify everything works.
With this knowledge, you can repair your chainsaw brake confidently and keep operating safely. Take your time with reassembly, double-check every connection, and never skip the testing phase.



