
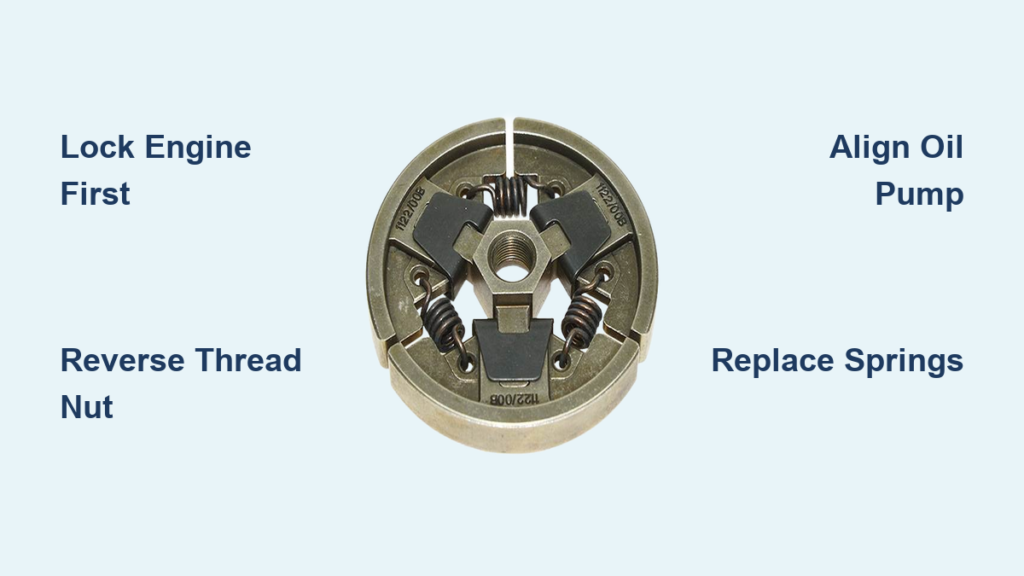
If your chainsaw runs but the chain won’t spin, or worse, creeps at idle despite low RPM, you likely have a failing clutch. The chainsaw clutch is the critical link between engine power and cutting performance, and when it fails, you lose efficiency, safety, and control. Common issues like chain creeping, slipping under load, or sudden disengagement are often rooted in worn clutch components. Fortunately, most clutch problems can be diagnosed and repaired at home with basic tools and about 30 to 60 minutes of work. This guide walks you through every step, from identifying failure signs to reassembling the clutch with precision, so you restore full power transfer and safe operation.
Recognize Early Clutch Failure Signs
Catching clutch issues early prevents engine strain and dangerous chain behavior. Watch for these red flags to avoid complete failure during use.
Chain Creeps at Idle
The chain moves slightly even when the engine isn’t under throttle. This serious safety hazard usually stems from fatigued clutch springs that cannot retract the shoes fully. On models like the Stihl MS 660, spring replacement often resolves creeping.
Clutch Slips Under Load
Engine revs rise, but the chain lags or stops during cutting. This indicates reduced friction between clutch shoes and drum. Common causes include worn or glazed drum surface, weak or broken springs, and contaminated friction linings. Slipping generates heat, accelerates wear, and risks chain breakage.
Engine Stalls When Cutting
A healthy saw maintains RPM under wood contact. If it stalls, the clutch may not sustain engagement. This commonly results from severely weakened springs or damaged drum grooves failing to grip.
Unusual Noises or Vibration
Grinding, rattling, or clunking sounds point to mechanical failure. Broken E-clips or C-clips allow parts to shift, collapsed needle-roller bearings create noise, and loose clutch dogs cause rattling. Excessive vibration damages bearings and crankshaft over time.
Know Your Clutch Components
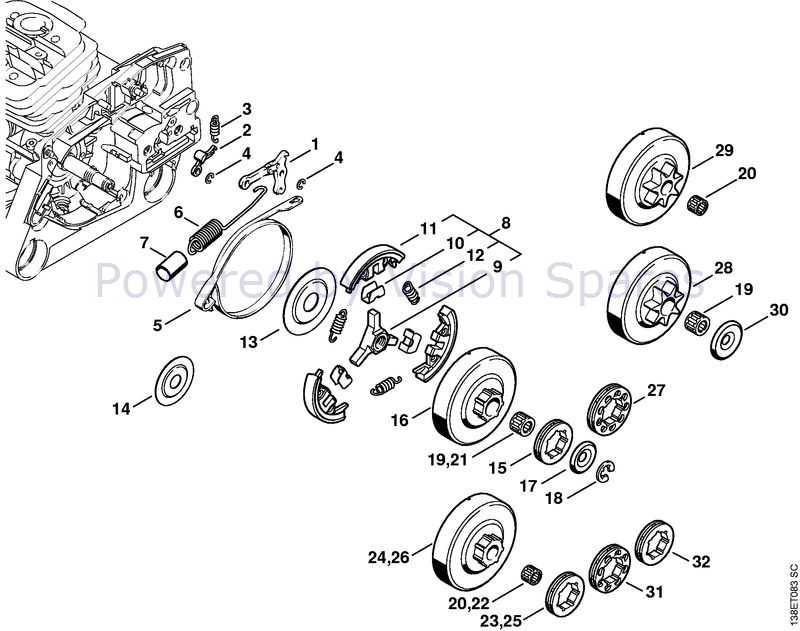
Understanding what is inside helps you diagnose and replace parts correctly. Each component plays a specific role in power transfer.
Core Parts in Every Clutch
The clutch drum serves as the outer housing that rotates and transmits power. Clutch shoes, also called dogs, expand at high RPM to contact the drum and are made with heat-resistant friction material. Clutch springs retract shoes at idle but weaken over time. The spider, or hub, attaches to the crankshaft and holds shoes and springs. The needle-roller bearing allows the drum to spin freely and must be lubricated during reassembly. The sprocket drives the chain and can be either spur or rim type. Retaining clips include the C-clip that holds the drum and the E-clip that secures the hub.
Spur vs Rim Sprockets
Spur sprockets are built into the drum, offering fewer parts and a simpler design. Rim sprockets are separate rings on the drum edge, easier to replace, and dissipate heat better. Rim sprockets typically last longer due to improved cooling.
Gather Essential Repair Tools
Having the right tools speeds up the job and prevents damage to your chainsaw.
Must-Have Tools
You will need a socket wrench or impact driver for the clutch nut, a 13 mm wrench or spark plug socket, a sturdy flathead screwdriver for engine locking, long-nose pliers for C-clips and E-clips, a hammer, approximately 12 inches of nylon rope for piston lock, and a shop towel with a brush for cleaning.
Recommended Upgrades
A piston locking tool works better than rope for frequent repairs. A torque wrench ensures proper tightening to 25 to 35 Nm. High-temperature grease lubricates the bearing, and a digital camera documents each step for reference.
Lock the Engine Before Repair
This critical step prevents crankshaft rotation during clutch removal. Never skip this procedure.
Use the Rope Method
First, remove the spark plug with a 13 mm socket. Feed 4 to 6 inches of clean nylon rope into the spark plug hole. Pull the starter rope slowly until the piston hits Top Dead Center, jamming the rope between the piston and cylinder head. The engine is now locked and ready for clutch work.
Pro Tip: If the rope slips during removal, add more rope to fill the gap. Just do not overfill the cylinder.
Use a Piston Locking Tool
Screw the tool into the spark plug hole. It engages the piston directly, eliminating rope risks entirely. This method is ideal for frequent repairs or professional work.
Remove the Clutch Drum Safely
Access the clutch by disassembling the outer components in the correct order.
Step-by-Step Disassembly
Disconnect the spark plug wire and turn off the saw. Engage the chain brake. Remove the side cover nuts and take off the cover, bar, and chain. Optionally remove the air filter cover for better access to the clutch area.
Remove the C-Clip
Use long-nose pliers to pry off the C-clip from the drum’s outer groove. Hold it from behind because clips can fly across the room when released. On Stihl inboard models, the C-clip is behind the drum, so remove the drum first to access it.
Pull Off Drum and Bearing
Slide the clutch drum straight off the crankshaft. The needle-roller bearing usually comes with it. Inspect both for debris, broken clips, or damaged dogs before proceeding.
Remove the Clutch Nut

Most modern saws use left-hand reverse threads on the clutch nut. This is a common mistake area that trips up many DIY mechanics.
Clockwise to Loosen, Counterclockwise to Tighten
Turn clockwise to loosen the clutch nut. Turn counterclockwise to tighten it. This seems backward, but it is the standard design for most chainsaws.
Exception: Some vintage American models, like certain McCulloch or Craftsman units with West Bend engines, use right-hand threads. Confirm your model before proceeding.
Best Removal Methods
An impact driver set to clockwise delivers shock without twisting the shaft and is the recommended method. A socket wrench combined with hammer taps against the clutch edge also works well. A clutch removal tool is a specialty socket designed for reverse threads and is highly effective.
Warning: Never force removal without first locking the piston. You risk damaging the crankshaft.
Replace Clutch Springs or Full Assembly
Decide whether to rebuild or replace based on the wear you observe.
Replace All Three Springs
Remove old springs with pliers, noting that hooks face downward. Install new springs one at a time, hooking each downward. Seat the nut flush on top when finished. Always replace all three springs together because if one is weak, the others are not far behind.
When to Replace the Entire Clutch
Replace the full assembly if friction material on shoes is less than 1 to 2 mm thick, if shoes are cracked or glazed, if the drum has deep grooves or blue discoloration from overheating, or if sprocket teeth are worn or chipped. OEM or high-quality aftermarket units cost under $50 and restore reliability.
Inspect and Clean Components
Prevent future issues by thoroughly checking every part during reassembly.
Check These Parts
Inspect clutch shoes and replace if thin or damaged. Check the drum and file minor burrs, but replace if scored or overheated. Replace the bearing if it is noisy, seized, or pitted. Inspect crankshaft threads for damage. Replace the sprocket if teeth are rounded or chipped.
Clean the Area
Brush away sawdust, oil, and carbon buildup. Wipe down the crankshaft end thoroughly. Clear any debris from the spark plug hole before reinstalling the rope.
Reinstall Clutch and Align Oil Pump
Misalignment kills chain life. Get this right or your repair will cause rapid wear.
Install Clutch Hub and Bearing
Slide the clutch hub with new springs onto the crankshaft. Apply high-temperature grease to the needle-roller bearing. Slide the bearing and drum back on together.
Align Oil Pump Drive
Match the notch, divot, or lug on the drum with the oil-pump shaft. It must click into place. Failure to align means no oil reaches the chain, leading to rapid wear and potential damage.
Critical: This is the most common DIY error. Double-check alignment before proceeding.
Secure with C-Clip
Reinstall the C-clip using pliers. Ensure it is fully seated in the groove. Replace the clip if it is bent or worn because cheap clips fail under stress.
Reassemble the Chainsaw
Follow these final steps to get your saw running safely.
Remove the Rope
Pull all nylon rope out of the cylinder. Check for remnants before reinstalling the spark plug.
Reinstall Spark Plug
Hand-thread first to avoid cross-threading. Tighten securely but do not overtighten.
Reattach Cover, Bar, and Chain
Place the guide bar on mounting studs. Insert the chain tensioner pin. Thread the chain around the bar and sprocket. Position the side cover and secure with nuts.
Adjust Chain Tension Correctly
Improper tension causes slipping or binding and ruins chains quickly.
Step-by-Step Tensioning
Lift the bar tip slightly. Turn the tension screw clockwise until slack is gone. The chain should rotate by hand but not sag. Fully tighten cover nuts while holding tension.
Final Checks
Confirm the chain brake engages and disengages smoothly. Manually spin the chain to ensure it moves freely. Verify the brake is disengaged before starting the engine.
Test the Repair Thoroughly
Verify safety and performance before using your saw.
Pre-Startup Safety Checks
Confirm the C-clip is fully seated. Check that oil pump is aligned. Verify chain tension is correct. Ensure the spark plug wire is connected.
Startup and Operation Test
Start the engine. If it floods, remove the plug, pull the starter to clear fuel, and let it dry. Check idle: the chain must not move. At 2,500 to 3,000 RPM, the chain should engage smoothly. Verify oil flow by checking for oil at the bar tip. Cut a small log to confirm no slipping and smooth power delivery.
Prevent Future Clutch Problems
Extend clutch life with smart maintenance habits.
Maintenance Tips
Inspect the clutch every 50 hours or annually. Replace all springs together and never mix old and new. Use OEM or quality clips because cheap ones fail. Lubricate the bearing during reassembly. Clean the clutch area regularly. Avoid high-RPM idling, which causes heat buildup. Maintain proper chain tension. Use bar and chain oil, never motor oil.
Troubleshoot Common Post-Repair Issues
| Problem | Likely Cause | Fix |
|---|---|---|
| Clutch won’t loosen | Turning counterclockwise | Turn clockwise to loosen |
| Crankshaft spins despite rope | Rope too short or piston not at TDC | Reinsert rope with piston at top |
| Chain moves at idle | Weak springs or misaligned drum | Replace springs, realign |
| No oil to chain | Oil pump not aligned | Reopen and align clutch notch |
| Engine floods | Carburetor issue after repair | Remove plug, clear, dry overnight |
| Clutch slips | Worn shoes or drum | Replace full assembly |
Follow Critical Safety Rules
Never skip these precautions. Always lock the piston before clutch work. Disconnect the spark plug first. Engage the chain brake during disassembly. Wear cut-resistant gloves and goggles. Use nylon rope, never cotton. Double-check oil pump alignment. Never run a saw with a loose or damaged clutch.
Frequently Asked Questions About Chainsaw Clutch Repair
How do I know if my chainsaw clutch is bad?
Common signs include chain creeping at idle, slipping under load, engine stalling during cutting, unusual noises or vibration, and inconsistent chain engagement. If your chain moves when the engine idles, the clutch springs are likely worn.
Can I replace just the clutch springs, or do I need the whole assembly?
You can replace just the springs if the clutch shoes and drum are in good condition. Replace the entire assembly if the friction material is worn thin, the drum is grooved or overheated, or the sprocket is damaged.
Why does the clutch nut have reverse threads?
The reverse thread prevents the clutch from loosening during operation. As the engine spins, the nut tightens instead of loosening, which is essential for safety during high-RPM operation.
How long does a chainsaw clutch last?
A well-maintained clutch lasts 200 to 300 hours of operation. Premature failure often results from overheating, incorrect chain tension, or poor lubrication.
What happens if I do not align the oil pump during reassembly?
If the oil pump drive is not aligned with the clutch notch, chain lubrication stops entirely. This causes rapid chain and bar wear and can lead to complete chain seizure during cutting.
Is chainsaw clutch repair worth the DIY effort?
Yes. Clutch springs cost under $20, a complete assembly costs under $50, and the repair takes 30 to 60 minutes. This is one of the most cost-effective fixes that restores full power transfer and safe operation.
Key Takeaways for Successful Chainsaw Clutch Repair
A properly repaired chainsaw clutch delivers smooth engagement, zero idle creep, and maximum cutting power. The most critical steps are locking the piston with nylon rope before work, remembering the reverse thread direction when removing the clutch nut, and precisely aligning the oil pump drive notch during reassembly. Always replace all three springs together and use OEM-grade clips to prevent premature failure. By following this guide, you have not only fixed a critical component but also deepened your understanding of your tool is mechanics. With regular inspection and correct maintenance, your clutch can last hundreds of additional hours. Keep your saw clean, your chain properly tensioned, and your clips OEM-grade, and you will stay safe, efficient, and in control every time you start the engine.



