
You’ve just finished chopping wood, and your axe isn’t biting like it used to. It pulls instead of cuts, forcing you to swing harder for less result. A dull axe isn’t just inefficient. It can also be dangerous, since poorly controlled swings lead to accidents. But you don’t need a professional smith or expensive tools to restore its edge.
Sharpening an axe with a bench grinder is one of the fastest ways to return a sharp bevel to your blade. Unlike hand files or whetstones, a grinder removes metal quickly, making it ideal for rebuilding damaged edges or restoring neglected tools. This guide walks you through every step, from setup and safety to angle control and finishing touches.
Essential Safety Precautions
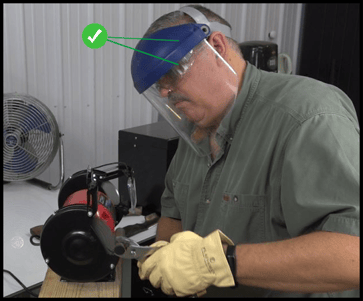
Before you plug in the grinder, protect yourself. High-speed grinding throws sparks, metal particles, and debris. One lapse can cause serious injury.
Wear Proper Protective Gear
Always wear the following items before grinding:
- Safety glasses or a full face shield to protect your eyes and face
- Hearing protection, especially with high-RPM grinders
- Fire-resistant gloves (leather work gloves) to guard against heat and sparks
- Close-fitting clothing with no loose sleeves or jewelry that could catch
Keep a fire extinguisher or bucket of sand nearby. Sparks can ignite flammable materials, especially in dry workshops or garages.
Secure the Grinder Properly
Ensure your bench grinder is firmly mounted to a stable workbench. Vibration reduces control and increases fatigue during use. Check that the tool rest is tight and properly adjusted, sitting less than 1/8 inch from the wheel to prevent pinching the axe head.
Choose the Right Grinding Wheel
Using the correct wheel makes a major difference in cut quality and heat control.
Use a Medium Grit Aluminum Oxide Wheel
For axe sharpening, a 60–80 grit aluminum oxide wheel works best. It removes metal efficiently without gouging the steel. Avoid coarse wheels (below 40 grit) unless reshaping a severely damaged edge.
Fine wheels (100+ grit) are better for finishing but too slow for initial bevel work. A dual-wheel grinder lets you start coarse and finish fine by switching sides.
Check Wheel Condition Before Use
Inspect the wheel for cracks, chips, or glazing (a shiny, smooth surface). A glazed wheel slips instead of cutting, generating excess heat. Dress the wheel with a grinder dresser if needed to restore its cutting surface.
Set the Correct Grinding Angle
The angle of the bevel determines how sharp and durable the edge will be.
Match the Original Bevel Angle
Most axes have a bevel angle between 25° and 35°. Splitting axes tend toward 35° for durability. Camping or carving axes use 25°–30° for sharper cuts. Examine the existing edge to match the factory angle.
To replicate it, hold the axe against the wheel lightly and observe where contact occurs. Adjust your hand position until the entire bevel touches evenly.
Maintain Consistent Contact Throughout
Let the grinder do the work rather than forcing the axe into the wheel. Apply light, steady pressure and keep the axe moving slightly side to side. This prevents hollowing the wheel or overheating one spot on the edge.
Sharpen in Stages: Inspect, Grind, Refine
Treat sharpening as a three-phase process: inspection, material removal, and refinement.
Inspect the Edge First
Look for nicks, rolls, or asymmetry along the cutting edge. If the edge is bent or rolled, straighten it with light strokes before grinding. Mark the bevel with a permanent marker to help you see where metal is being removed.
Grind with Controlled Passes
Hold the axe firmly with both hands. Place the bevel flat against the wheel while maintaining your chosen angle. Use short, smooth passes lasting 1–2 seconds each, followed by a cool-down period.
Pro Tip: Dip the edge in water every 10–15 seconds to prevent overheating. If the steel turns blue, you’ve ruined the temper and softened the blade.
Focus on Even Bevel Development
Work one side at a time. After 5–10 passes, check for a uniform shiny surface across the bevel. Flip and repeat on the other side, matching the number of strokes to maintain symmetry.
Avoid rounding the bit or creating a secondary edge. Keep the strike area at the top of the head clear of the wheel.
Avoid Common Grinding Mistakes
Speed tempts rushed work, but mistakes cost more time in the long run.
Never Overheat the Axe Edge
Blue discoloration means the steel has exceeded 400°F, losing hardness. Always:
- Use light pressure
- Take frequent breaks
- Cool in water often
If the edge overheats, you may need to reheat-treat the axe, which is a job for specialists.
Don’t Alter the Bit Profile
The axe’s cutting edge should remain straight or slightly curved, depending on design. Grinding too much at the toe or heel distorts balance and cutting function. Follow the original shape precisely.
Avoid Uneven Bevels
Applying more pressure on one side creates a lopsided edge that pulls during swings. Count strokes or use equal time per side to stay balanced throughout the process.
Test and Refine the Sharpness

A sharp axe should bite paper and shave wood cleanly.
Perform the Paper Test
Hold a piece of printer paper vertically. A properly sharpened axe should cleanly slice through with minimal pressure. If it catches or tears, touch up the edge with additional light passes.
Deburr the Back Side
After grinding, a small burr (wire edge) forms on the back of the bevel. Remove it by lightly dragging the flat side of the axe head on a sanding block or sharpening stone.
Use a Sanding Wheel for Polish (Optional)
For a mirror-like finish, switch to a 120+ grit sanding wheel or flap disc. Light polishing reduces friction and improves cutting performance, especially in green or wet wood.
Maintain Your Axe After Sharpening
A sharp edge lasts longer with regular care.
Apply Light Oil to the Blade
After sharpening, wipe the axe head with a light coat of camellia oil, mineral oil, or boiled linseed oil to prevent rust. Avoid heavy greases that attract dirt and debris.
Store in a Dry Place
Moisture dulls edges and causes pitting over time. Hang your axe or store it in a sheath indoors, away from damp garages or sheds.
Touch Up with a File in the Field
Carry a bastard file or diamond sharpener when camping. Quick field touch-ups preserve the edge between full grinding sessions.
When to Use Other Sharpening Methods
While grinders are fast, they aren’t always the best choice.
Use a File for Light Maintenance
If the axe is only slightly dull, a mill bastard file (8–10 inches) is safer and more controlled. It won’t generate heat and allows precise edge work.
Try Whetstones for Precision
For carving axes or hatchets needing surgical sharpness, finish with water or oil stones in the 400–2000 grit range. This gives ultimate control over the final edge.
Reserve Grinders for Major Repairs
Use the grinder when:
- Rebuilding a rolled or chipped edge
- Restoring a neglected axe
- Sharpening multiple tools quickly
For routine upkeep, slower methods often preserve the tool better over time.
Frequently Asked Questions About Sharpening an Axe with a Grinder
What grit grinding wheel is best for sharpening an axe?
A 60–80 grit aluminum oxide wheel works best for most axe sharpening tasks. It removes metal efficiently without gouging the steel or generating excessive heat.
How do I avoid overheating the axe when grinding?
Use light pressure, take short passes of 1–2 seconds, and dip the edge in water every 10–15 seconds. If the steel turns blue, stop immediately since the temper has been damaged.
What angle should I grind an axe to?
Match the original factory bevel, typically between 25° and 35°. Splitting axes use steeper angles around 35° for durability, while carving and camping axes use 25°–30° for sharper cuts.
Can I use an angle grinder instead of a bench grinder?
Yes, an angle grinder works for axe sharpening but offers less control than a bench grinder. Use a medium grit flap disc and keep the tool moving to avoid overheating one spot.
How do I know when my axe is sharp enough?
A properly sharpened axe should cleanly slice through a single sheet of printer paper held vertically. It should also shave wood without requiring excessive force.
Should I oil my axe after sharpening?
Yes, wipe the axe head with a light coat of camellia oil, mineral oil, or boiled linseed oil after sharpening. This prevents rust and protects the freshly ground edge from moisture damage.
Final Thoughts on Sharpening an Axe with a Grinder
Sharpening an axe with a grinder is fast and effective when done correctly. The three most important factors are wearing proper safety gear, maintaining the correct angle, and preventing overheating through light pressure and frequent cooling dips.
Start by inspecting your current edge, match the original bevel angle, and work in controlled passes. Test your progress with the paper test and finish by deburring and oiling the blade. With practice, you’ll develop a rhythm that keeps your axe ready for any task.
Grab your safety glasses, mount your grinder securely, and restore that edge today.



