

If your Poulan chainsaw won’t start, stalls under load, or the chain won’t turn, you’re not alone. Thousands of homeowners and landscapers face the same issues, most of which stem from ethanol-damaged fuel systems and long-term storage neglect. The good news? With the right tools, parts, and step-by-step guidance, you can restore your Poulan chainsaw to full power in under an hour. This guide covers everything from diagnosing no-start conditions to rebuilding carburetors, replacing fuel lines, and installing a bolt-on chain brake kit.
You’ll learn how to clean a gummed-up fuel tank, route the correct fuel lines, adjust the carburetor for smooth idle and full throttle, and prevent future failures with smart maintenance. Whether you own a P3314, PP4218, or Poulan 2750, this repair framework applies across models. Let’s get your saw running like new.
Diagnose Starting Problems First
Before tearing into your chainsaw, identify the root cause of starting issues. Most dead Poulan chainsaws fail due to stale fuel, clogged passages, or worn components, all fixable without replacing the entire unit.
No-Start? Check These 7 Causes
The most common culprits for a Poulan that won’t fire are straightforward to diagnose. Stale fuel ranks as the number one issue, as ethanol-blended gas degrades in just 30 days and leaves varnish that blocks fuel flow. Clogged carburetor jets from gum buildup stop fuel from entering the engine entirely. A faulty spark plug, whether fouled, cracked, or improperly gapped at 0.030 inches, will prevent ignition. Blocked fuel filters or collapsed fuel lines cut off the fuel supply. A cracked primer bulb fails to draw fuel due to ethanol damage. Air leaks in the intake from damaged gaskets let unmetered air in, disrupting the fuel mixture. A sheared flywheel key prevents proper spark timing, though this is rarer.
Quick Test: Pull the starter cord 10 times with the choke on. If it doesn’t fire, check for fuel in the primer bulb and a blue spark at the plug.
Starts Then Dies? Look Here
If your saw fires but stalls within seconds, the problem is likely fuel delivery or idle settings. An idle screw set too low causes the engine to die even though the chain may not move. A partially clogged fuel line delivers fuel briefly then cuts out. A dirty air filter chokes airflow and causes a rich mixture that leads to stalling. A leaking fuel line introduces air that breaks the siphon action. Worn carburetor diaphragms fail under load and stop the fuel pump.
Pro Tip: Replace both fuel lines, even if one looks fine. One weak line causes recurring issues.
Gather the Right Tools and Parts
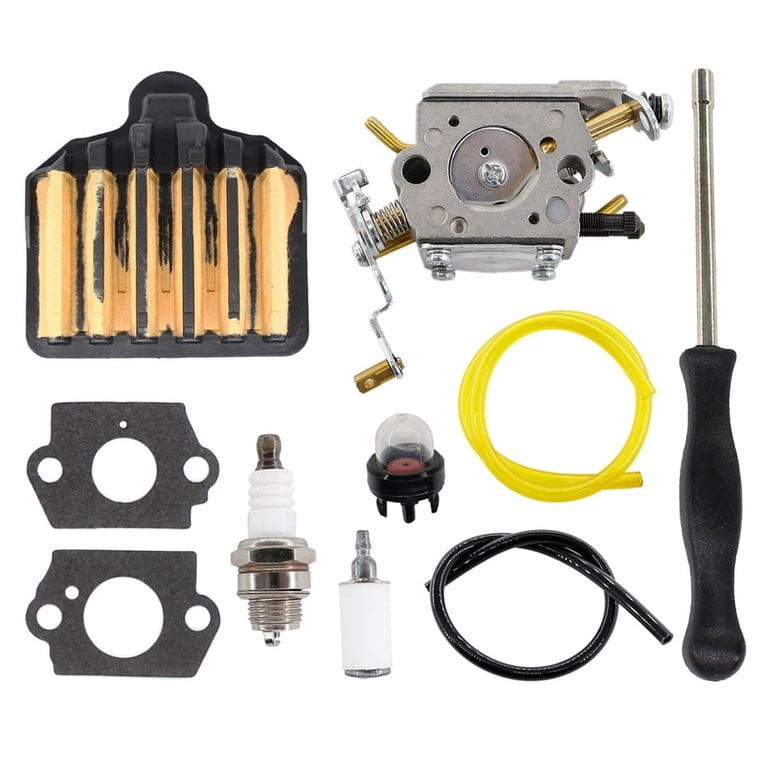
Using the correct tools prevents damage and speeds up repairs. Most Poulan models use standard fasteners and share components, making replacements easy to source.
Essential Repair Tools
Keep these tools on hand before starting your repair. A T25 Torx screwdriver removes covers, carb screws, and the side plate. A spark plug wrench fits all Poulan 2-stroke models. An 8 mm socket handles air filter base nuts. Needle-nose pliers handle C-clips, fuel lines, and small parts. A 12-inch hemostat feeds fuel line through the tank without kinking. A flat-head screwdriver adjusts the throttle and removes gasket residue. A splined carb adjusting tool prevents stripping idle and H-screws. A camera or phone lets you snap photos during disassembly for perfect reassembly.
Critical Replacement Parts
Fuel System Upgrades
For fuel lines, you need two specific sizes. The 3/16-inch OD pickup line with filter goes in the smaller tank hole. The 0.140-inch OD return line goes in the larger hole. Replace the fuel filter yearly since old ones shed debris. For the primer bulb, use Wabro or Zama brand and avoid generics. The short nipple connects to the carburetor on the suction side, and the long nipple connects to the return line going back to the tank.
Warning: Never reuse old fuel lines. Ethanol makes them brittle, and they’ll crack within days.
Carburetor Rebuild Kit
Use an OEM Zama, Walbro, or HIPA kit, not universal brands. The RB-129 kit includes metering and pump diaphragms, ribbed and flat gaskets, needle, spring, lever, and sediment screen. Install with two-stroke oil or transmission fluid on gaskets to prevent dry tearing.
Other Key Replacements
Gap the spark plug to 0.030 inches before installation. Replace or clean the foam air filter every 10 hours. The bolt-on chain brake kit includes the band, spring, housing, and all hardware. Remove the C-clip carefully with pliers to retain the clutch drum.
User Insight: A full repair including lines, filter, bulb, and carb kit costs under $25 and fixes 90% of problems.
Clean the Fuel Tank Thoroughly
Even if the tank looks clean, varnish from old ethanol fuel coats the interior and flakes into the system. Cleaning it prevents future clogs.
Remove All Old Fuel
Drain the tank completely using a siphon or by tipping the saw sideways. Remove the cap to break the vacuum and speed drainage. Wipe residue with paper towels.
Dissolve Varnish With Solvent
Pour kerosene, mineral spirits, or brake cleaner into the tank at half a cup. Swirl vigorously for 30 seconds. Use a bottle brush for stubborn deposits. Drain the solvent and blow out with 30 to 40 psi compressed air. Wipe dry with a lint-free cloth.
Do not use WD-40 or Gum-Out. These leave an oily residue that clogs carburetors.
Reinstall Pickup Tube and Filter
Cut the 3/16-inch line at an angle. Use a hemostat to feed it through the small hole in the tank. Attach the new filter and push until it rests on the bottom. Feed the 0.140-inch return line through the large hole with no filter needed. Trim both lines flush outside the tank.
Visual Cue: The filter should sit flat on the tank floor, and the return line should extend half an inch into the tank.
Rebuild the Carburetor Step by Step
A failed carburetor is the number one cause of hard starts and poor performance. Rebuilding it with a fresh diaphragm kit restores fuel flow and saves you $40 compared to buying a new unit.
Remove the Carburetor
Unscrew the T25 screws holding the air filter base. Disconnect the fuel lines and throttle linkage. Pull the carburetor free from the engine mounts.
Disassemble and Clean
Remove all screws with the T25 driver. Take out the needle, spring, and lever. Extract the metering diaphragm and sediment screen. Spray the housing with brake cleaner to clear all varnish from jets and passages.
Critical Detail: The screen must sit flat. Never install it sideways.
Reassemble With New Kit
Place the gasket on the carburetor body. Install the metering diaphragm with the smooth side facing the body and the rivet toward the engine. Insert the screen, then the lever, needle, and spring. Secure with the screw. On the opposite side, add the gasket and pump diaphragm. Align the prong with the hole and tighten the screws snug but not over-tightened.
Lubricate: Dab two-stroke oil on diaphragms before closing the carburetor.
User Tip: OEM kits from eBay or Amazon last longer than generic brands.
Install New Fuel Lines and Primer Bulb

Routing the correct lines prevents air locks and ensures reliable priming.
Route Lines Correctly
The smaller tank hole connects to the 3/16-inch line with the filter for fuel pickup. The larger tank hole connects to the 0.140-inch line for returning fuel to the tank. Feed lines with a hemostat to avoid kinks.
Connect Primer Bulb
Attach the short nipple to the carburetor inlet to draw fuel. Connect the long nipple to the 0.140-inch return line. Press the bulb into the housing, where it should seal without leaks.
Test: Press the bulb 5 to 7 times. It should firm up and hold pressure.
Warning: Reversed lines cause hard starts or no fuel draw.
Replace Chain Brake With Bolt-On Kit
A failed chain brake is dangerous. The bolt-on kit makes replacement fast and foolproof.
Remove Old Brake Assembly
Take off the side cover using two T25 screws. Slide off the bar, chain, and clutch cover. Remove the upper handle using the two bottom screws. Take out the four brake screws, pry off the C-clip, and remove the clutch drum.
Install New Brake Band
Slip the new brake band over the clutch drum. Align it with the spring and linkage in the new housing. Secure with four screws. Reinstall the washer and C-clip. Slide the upper handle back on and fasten the screws.
Reattach Bar and Chain
Mount the bar onto the bolts and pull forward fully. Install the chain with cutting edges facing backward toward the engine. Place the side cover so the adjustment pin drops into the bar hole. Tighten the nuts finger-tight first, then fully.
Final Test: Engage the handguard. The chain must stop instantly.
Expert Note: Bolt-on kits eliminate guesswork since no spring tensioning is needed.
Reassemble and Start the Engine
With fresh parts installed, reassembly is straightforward if you follow the sequence.
Reconnect Key Components
Attach the throttle linkage to the carburetor with the choke lever hole facing forward. Mount the air filter base and partially tighten the 8 mm nuts. Insert the new spark plug gapped to 0.030 inches. Reinstall the side cover and fuel lines, ensuring no kinks.
Prime and Start
Press the primer bulb 8 to 10 times until it feels firm. Set the choke fully on. Pull the starter cord smoothly. After the first fire, turn the choke off and let the engine warm up.
If no start: Check for pinched fuel line, verify spark by grounding the plug and pulling the cord, and confirm fuel draw by watching the bulb firm up.
Tune the Carburetor for Smooth Performance
A poorly adjusted carburetor causes stalling, smoking, or weak power. Use this method to dial it in.
Set Baseline Adjustments
Turn the idle screw in until seated, then back out 1.5 turns. Turn the high-speed H screw in until seated, then back out 2 turns. Let the engine warm up for 3 to 5 minutes.
Fine-Tune With Splined Tool
Adjust the idle screw until the engine runs smoothly without chain movement. Test acceleration and adjust the H screw for maximum RPM and clean response. Use quarter-turn increments and back off if the engine smokes or bogs.
Pro Tip: An over-rich mixture causes black smoke, while over-lean causes overheating.
Prevent Future Failures
Avoid repeat repairs with simple maintenance and smart fuel choices.
Follow Preventive Maintenance Schedule
Replace the spark plug annually or every 25 hours. Clean or replace the air filter every 10 hours or before storage. Inspect fuel lines before each season. Replace the fuel filter annually. Drain the fuel tank before storing for more than 30 days.
Store Properly
Drain fuel before long-term storage. Run the engine until it stalls to clear the carburetor. Store in a dry, covered area. Alternatively, use engineered fuel like Echo Red Armor or True Fuel, which is safe for over 2 years.
User Insight: Mechanic in a Bottle or VP Fix-A-Fuel can clean gums without disassembly. Try this before tearing down the saw.
Final Checklist: Confirm Repair Success
Before cutting wood, verify all systems work correctly.
Run through this checklist. Fresh 50:1 fuel mix should be in a clean tank. New fuel lines, filter, and primer bulb must be installed. The carburetor should be rebuilt with correct diaphragm orientation. The spark plug needs to be gapped to 0.030 inches. The chain brake stops the chain when engaged. The chain must be installed backward with cutting edges toward the engine. Chain tension should be correct, lifting the tip so the chain doesn’t rise above driver height. Idle should be smooth with no chain creep. Full throttle should respond without bogging. The muffler screen should be clean.
Run the saw for 5 or more minutes to burn off solvents and seat components.
Frequently Asked Questions About Poulan Chainsaw Repair
Why does my Poulan chainsaw only run for a few seconds then die?
This is typically a fuel delivery problem. The idle screw may be set too low, the fuel line may be partially clogged, or the carburetor diaphragms may be worn and failing under load. Replace the fuel lines, filter, and primer bulb, then rebuild the carburetor with a fresh diaphragm kit.
How often should I replace fuel lines on my Poulan chainsaw?
Inspect fuel lines before each cutting season and replace them annually. Ethanol-blended fuel causes rubber lines to deteriorate within months, so proactive replacement prevents starting problems.
Can I use any carburetor rebuild kit for my Poulan?
Use OEM or quality brand kits like Zama, Walbro, or HIPA. Avoid generic universal kits, as they have lower success rates and may not include correct gaskets or diaphragms for your model.
What is the correct spark plug gap for a Poulan chainsaw?
Set the spark plug gap to 0.030 inches. This is critical for reliable ignition across all Poulan 2-stroke models.
How do I prevent ethanol fuel from damaging my chainsaw?
Use engineered fuel like Echo Red Armor, True Fuel, or VP Small Engine Fuel for storage exceeding 30 days. Alternatively, drain the tank completely and run the engine until it stalls before storing.
Key Takeaways for Poulan Chainsaw Repair
Ethanol fuel is the number one enemy of stored chainsaws, causing gum, varnish, and rubber degradation in fuel systems. Rebuild the carburetor if your saw sat with fuel for over 12 months, especially with ethanol-blended gas. Replace both fuel lines, the filter, and the primer bulb together for the best success rate, as one weak component causes recurring issues. Use OEM or branded rebuild kits from Zama or Walbro rather than generic alternatives. After repairs, run the engine for at least 5 minutes to burn off solvents and seat the new components. With these steps, most Poulan chainsaws return to full power for under $25 in parts.



