
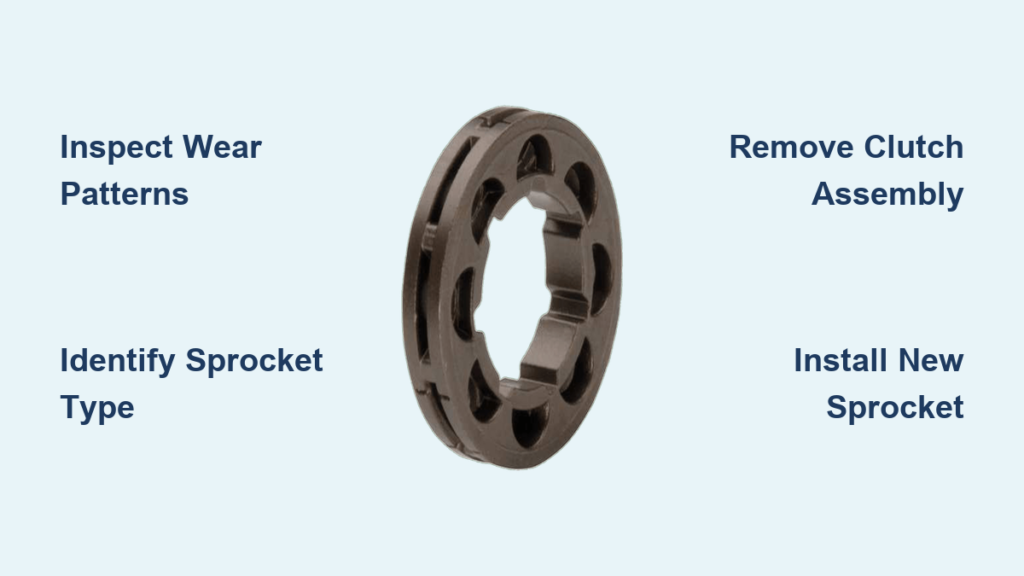
A worn chainsaw sprocket can turn a powerful tool into a frustrating liability that slips under load. If your chain vibrates excessively or throws off the bar, the drive sprocket likely needs replacing.
You can fix this issue in about 30 minutes with basic tools and the right steps. This guide shows you how to diagnose wear, identify your sprocket type, and install a new one safely.
Diagnose Sprocket Wear Before It Fails

Regular inspection prevents costly damage to your bar and chain. You should check the drive sprocket every time you sharpen your chain to catch early signs of failure.
Inspect Visual Wear Patterns
Look closely at the teeth on your spur or star sprocket. Healthy teeth are thick and symmetrical, while worn ones appear hooked or pointed at the tips. Deep grooves between teeth indicate the chain has been riding too low.
Rim or floating sprockets have built-in wear indicators on the channel sides. Replace the part immediately if the channel depth exceeds these small lines or if the sprocket looks warped.
Recognize Performance Red Flags
Operational issues often signal hidden wear before you see it. The chain may slip during cutting even when tension feels correct due to poor grip on the links.
You might notice a drop in cutting power despite having a sharp chain. Excessive vibration or frequent chain derailments are serious warnings that the sprocket cannot maintain alignment.
Know When to Replace Immediately
Follow the rule of replacing the drive sprocket after wearing out two chains. This standard practice prevents accelerated wear caused by stretched or dull chains.
Replace the part right away if you see chipped teeth or deep gouges. Continuing to run a damaged sprocket ruins new chains and guide bars quickly.
Identify Your Sprocket Type Correctly
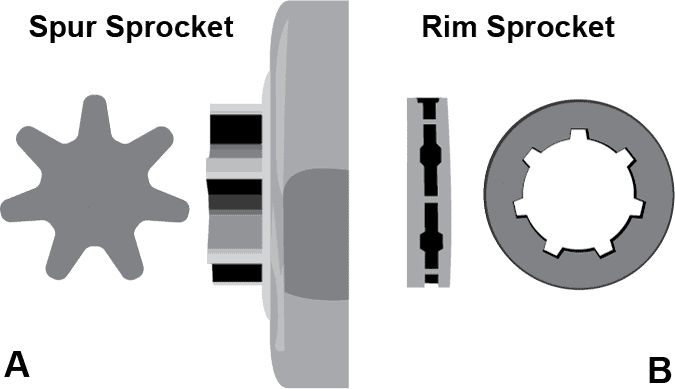
Knowing your specific sprocket configuration determines your repair strategy. Chainsaws generally use either spur or rim designs with distinct replacement needs.
Distinguish Spur From Rim Designs
A spur sprocket is a single unit built into the clutch drum with an open star shape. You must replace the entire clutch drum assembly when this type wears out.
A rim sprocket is a separate ring that slides over a splined hub on the clutch drum. This design allows you to replace just the sprocket without touching the drum itself.
Confirm Compatibility Specs
Match the pitch, gauge, and tooth count exactly when buying a replacement part. The pitch must align with your chain and bar specifications to ensure proper fit.
Tooth count affects performance significantly. Fewer teeth increase torque for heavy cutting, while more teeth boost chain speed for softer wood.
Gather Required Tools for the Job
Having the right equipment makes the repair process smoother and safer. You need specific tools to remove the clutch and handle small retaining parts.
Essential Tools List
- 19mm socket wrench for cover nuts
- Flathead screwdriver for tensioning
- Needle-nose pliers for circlips
- Piston stopper tool or clean rope
- Hammer for clutch removal
- Spark plug wrench
Optional But Helpful Items
A clutch removal tool makes taking off the assembly easier and safer than using improvised methods. Always have a replacement circlip on hand since these small parts stretch easily.
Keep a spare sprocket washer ready and check the bearing for smooth rotation. These small components ensure the new sprocket functions correctly.
Remove the Old Sprocket Safely
Proper disassembly prevents injury and protects internal engine components. Follow these steps to access and remove the worn drive sprocket.
Remove Cover and Chain
Turn off the saw and remove the spark plug boot to prevent accidental starts. Unlock the chain brake and use a 19mm socket to remove the two side cover nuts.
Loosen the tensioning screw to slacken the chain completely. Slide the guide bar and chain off the saw, noting the bar orientation for reassembly.
Lock the Crankshaft Securely
Remove the spark plug and insert a piston stopper tool into the hole. Gently pull the starter cord until the piston hits the tool and locks at top dead center.
Use a clean shoestring if you lack a stopper tool. Feed most of it into the cylinder and pull the cord slowly so the piston traps the rope.
Remove the Clutch Assembly
The clutch nut is reverse-threaded, so turn it counter-clockwise to loosen. Use a clutch removal tool or tap a screwdriver across the fan slots with a hammer.
Lift off the clutch assembly to expose the sprocket. Use needle-nose pliers to remove the circlip and washer on rim sprocket models before sliding off the sprocket.
Install the New Sprocket Properly

Correct installation ensures longevity and safe operation. Clean all components thoroughly before fitting the new parts.
Fit a Rim Sprocket Correctly
Clean the splined hub and shaft with a cloth before installing. Slide the sprocket bearing back on if you removed it during inspection.
Align the new rim sprocket with the splines and push it fully onto the hub. Place the new washer on top and use pliers to snap the new circlip into the groove securely.
Replace a Spur Sprocket Unit
Slide the new clutch drum assembly onto the shaft for spur sprocket models. Align it properly and ensure it rotates smoothly without binding.
No additional clips or washers are needed since this part includes both the drum and sprocket. Verify the unit sits flush against the engine housing.
Reassemble and Reinstall Chain

Reassembly requires attention to detail to ensure safe operation. Double-check all connections before starting the engine.
Reattach the Clutch Assembly
Place the clutch back over the sprocket or drum carefully. Thread the clutch nut on by hand and turn it clockwise to tighten since it is reverse-threaded.
Tighten the nut securely while the piston remains locked. A light tap with a hammer helps seat it properly before removing the piston stopper.
Mount Bar and Chain
Reinstall the spark plug and reconnect the boot before mounting the bar. Position the guide bar onto the mounting studs and ensure the tensioning screw fits the adjustment hole.
Install the chain with cutting edges facing away from the engine on the top of the bar. Loop the chain around the bar and engage drive links with the sprocket teeth.
Tension the Chain Properly
Turn the tensioning screw clockwise until the chain hugs the bottom of the bar. You should still be able to pull it around by hand without excessive slack.
Hold tension while tightening both bar nuts securely. Check tension again after a few minutes of use since new chains stretch quickly.
Prevent Future Sprocket Issues
Proper maintenance extends the life of your entire cutting system. Simple habits reduce wear and prevent premature failure.
Maintain Proper Chain Tension
A loose chain accelerates sprocket wear significantly. Check tension before every use to ensure the chain is snug but not too tight.
Rotate and Flip the Bar
Flip your guide bar every time you refit the chain to even out rail wear. A worn bar groove causes uneven sprocket wear and poor performance.
Replace Chains Early
Don’t wait until a chain is completely dull before replacing it. A stretched, blunt chain grinds down the sprocket faster than a sharp one.
Frequently Asked Questions About Chainsaw Sprockets
How often should I replace my chainsaw sprocket?
Replace the drive sprocket after wearing out two chains or when you replace the guide bar. Immediate replacement is necessary if you see chipped teeth or deep grooves.
What is the difference between spur and rim sprockets?
Spur sprockets are integrated into the clutch drum as one unit, requiring full drum replacement. Rim sprockets are separate rings that slide over a hub, allowing individual replacement.
Why does my chainsaw chain keep slipping under load?
Slipping often indicates worn sprocket teeth that no longer grip the chain links effectively. Check for visual wear patterns and replace the sprocket if teeth are hooked or pointed.
Can I use a different tooth count sprocket on my saw?
You can change tooth counts to alter torque or speed, but stick to factory specs unless you are a professional. Fewer teeth increase torque while more teeth boost chain speed.
What tools do I need to change a chainsaw sprocket?
You need a 19mm socket, needle-nose pliers, a piston stopper or rope, and a hammer. A clutch removal tool makes the job easier but is not strictly required.
How do I know if my rim sprocket is worn out?
Check the wear indicators on the channel sides of the sprocket. Replace it if the channel depth exceeds these marks or if the sprocket appears warped or asymmetrical.
Key Takeaways for Changing Your Chainsaw Sprocket
Replacing a worn chainsaw sprocket restores cutting power and prevents damage to your bar and chain. Regular inspection and timely replacement keep your saw running efficiently for years.
Carry spare parts like circlips and rim sprockets if you work far from home. Proper maintenance saves money and ensures safe, reliable operation every time you cut.



